4 devs by devs: Kubernetes interview question made easy

Introduction to kubernetes

Kubernetes becomes defacto standard runtime environment for modern cloud-native applications. As a developer, you should understand the basic concepts behind and operate the application reasonably in DevOps mode. This post aims to explain basic concepts and provide a solid grounding you can further improve your knowledge and prepare you for day-to-day work and potential interview questions. This post is organized as a series of closed topics where understanding those areas should allow you to answer a range of questions. Kubernetes is a complex system, so we simplify things. If you want to prepare for Kubernetes Certified Developer (KCD), this post can be a stepping stone.

What is Kubernetes

Kubernetes is an open-source container orchestration tool for managing multi-container (e.g. by docker) applications. It is in some sense similar to docker swarm or loosely related to docker-compose. Kubernetes was initially developed by Google and released as open-source in 2014.

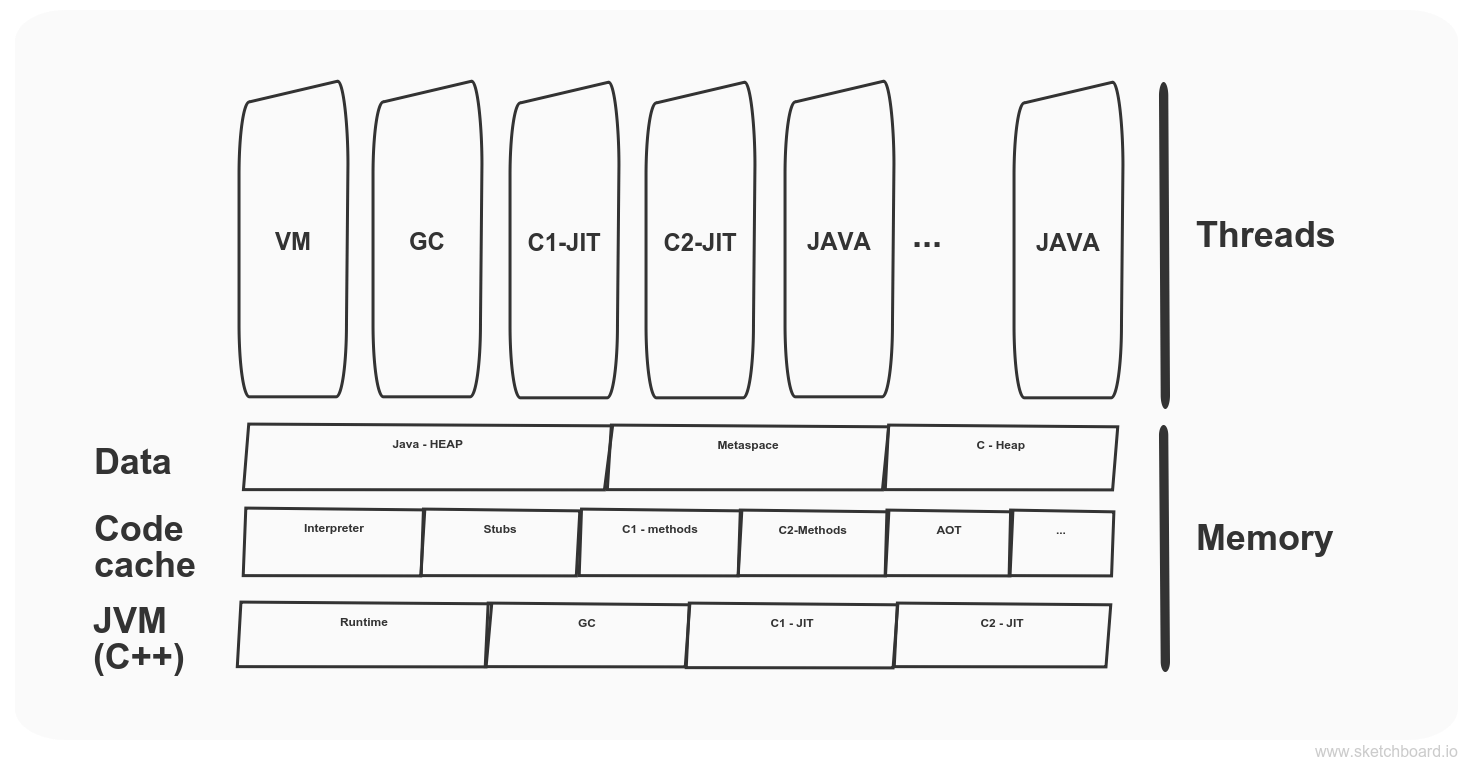
Simplified kubernetes architecture diagram

After reading this section, you should be able to answer the following questions:

  • What are the components of the kubernetes cluster?
  • What are the row responsibilities of those components?

We are not going into great detail to provide a high-level context as this post is not aimed at Kubernetes administrators but rather developers.

Simplified kubernetes architecture

Master node

The master node is responsible for the management of the cluster and is running control plane components. Kube-apiserver expose APIs for management. Controller managers consist of two distinct types: cloud and Kube related. Cloud controller embed a cloud-specific control logic while Kube related take care of kubernetes cluster related things, e.g. node statuses, the job runs, access token creations etc. All data are stored in etcd key-value store. Kube-scheduler is responsible for newly created pods and select nodes to run them. It takes into consideration various limitations and specifications for a given pod. 

Worker Nodes

Worker nodes are running workloads and consist of Kublet and kube-proxy. Kube-proxy is a network proxy running on each node in the cluster and is responsible for network communication according to configuration. Kublet runs on each node as well, and his responsibility is to make sure that pod containers are running and healthy.

Kubernetes basic concepts

After reading this section, you should be able to answer the following questions:

  • What is kubernetes manifest?
  • What is a kubernetes pod?
  • What is a control manager?
  • How kubernetes control loop operate?

Kubernetes control loop – the heart of the kubernetes

Kubernetes is based on the modern declarative DevOps principle that you describe the desired state of things rather than a set of steps that lead to that state. At the heart of Kubernetes, there is a control loop that constantly evaluates a current state versus a desired state and requests appropriate corrections that should lead towards it. The desired state in the Kubernetes is described as a Kubernetes manifests, a bunch of YAML files, that describes a state for various kubernetes objects called kinds, e.g. deployment. Controllers continuously execute the control loop and drive changes, usually through an apiserver. The controller is typically responsible for one or more kubernetes types/kinds. The basic kind which acts as a unit of scalability in kubernetes is called a pod. The pod can consist of one or more containers with specified parameters. 

Kubernetes object kinds

After reading this section, you should be able to answer the following questions:

  • What is the difference between service and ingress?
  • How are kubernetes objects organized?
  • What is a daemonset good for?
  • What is the difference between deployment and stateful set?
  • How to store sensitive information in the cluster?
  • What are lower-level kubernetes objects? 

Basic Kubernetes object kinds

Kubernetes deployment consists of various abstractions over infrastructure that are described in kubernetes as object kinds. They can be divided according to different criteria:

  • High-level kinds vs lower level kinds
  • Stateful vs stateless
  • Ephemeral vs permanent kinds 
basic kubernetes kinds

The image above describes the basic kinds used in kubernetes deployment. As mentioned earlier, the basic unit of scalability and deployment is a pod. Pod represents a set of containers with associated resources granted to them. Because a pod is a transient object that can be freely moved in the cluster, e.g. by re-scheduling, kubernetes provide a service object used as a permanent locator/address within a cluster (implements a service locator pattern). Service can be represented by, for example, a load balancer. The sole purpose of ingress is to reach the pods running in the cluster from the outside world. Ingress is typically represented by cloud global HTTPS load balancer and/or Nginx proxy server or similar. Trafic is further routed based on the host header to the appropriate service within the cluster. As the pod is transient, so the container does. To provide persistent storage to a container, the concept of persistent volume claim (pvc) addresses this requirement. ConfigMap object provides a set of “static” files, e.g. for container configuration purposes. In comparison, secrets offer a way how to access sensitive information from containers.

Those lower-level objects can be further abstracted by kubernetes higher-level kinds like deployment or stateful sets, which removes a need to specify replica sets. Deployment is primarily aimed for stateless applications, while stateful set provides ways to maintain pod identity through pod restarts or relocation, e.g. moving storage around or keeping communication to a given pod.

Different runtime requirements

To address the different needs for applications runtime, kubernetes introduces a few more concepts: Kubernetes jobs and deamon sets. A deamon set is a special kind of deployment pod that runs on every VM machine from a node pool. This kind of deployment is typically used for VM metrics collection etc. Kubernetes jobs provide a way how to run a single task in the kubernetes cluster. For example, spinnaker custom stages are managed this way.

Object versioning

Nearly every object in kubernetes has its version. So it is possible to restore any version running by activating those. Unfortunately, the only exceptions to those rules from the basic objects mentioned above are ConfigMaps and Secrets (if I am not mistaken). Restoring a deployment version without a corresponding version of configuration is one of the big shortcomings, and in my opinion, the decision was unlucky. There are techniques how to deal with that.

Interaction with kubernetes cluster, managing kubernetes deployment

After reading this section, you should be able to answer the following questions:

  • What is a key tool for interaction with the cluster?
  • What are the basic operational models/deployments?
  • How do you manage resources?
  • What is the difference between liveness and readiness probe?

Kube control

When interacting with the Kubernetes cluster directly, the key tool is Kube control (kubectl). Kubectl is a command-line utility that interacts with a cluster api server. It allows you to add or remove deployment, get the version of any manifest file. It also provides a set of administrative commands.

Using kubectl, you can drive a deployment as a rolling upgrade ( as a default scenario), a more advanced procedure via replica controllers or just simple scaling up or down pods (as shown in the example).

kubectl scale --replicas=3 deployment/mysql

Resource management

Every pod specification contains a section of manifest dedicated to resources. The resource requests section specifies resources necessary for starting the pod containers, which the scheduler uses to plan a deployment. The resource limit section defines resources that cannot be exceeded, and the pod will get killed or throttled. This is a fundamental mechanism for configuring resources from bursty to guaranteed load and one way that affects the quality of service.

    resources:
      requests:
        memory: "64Mi"
        cpu: "250m"
      limits:
        memory: "128Mi"
        cpu: "500m"

Kubernetes probes

Every pod is evaluated in the kubernetes control loop to correct potential differences from the desired state. To make sure that the pod is ok kubernetes use liveness and readiness probes mechanism. The liveness probe checks whether your application is up and running. If not, kubernetes will kill and restart the pod. The readiness probe checks whether the pod can accept and process new requests. As a software developer, you should provide such endpoints that correctly implement the logic to provide such insight. Only with correctly implemented endpoints, you can achieve a zero-downtime deployment. 

Kubernetes advanced topics

After reading this section, you should be able to answer the following questions:

  • How do you govern application uptime? ~ pod disruption budget
  • How do you adopt an application to various load scenarios? ~ autoscaling
  • How do you isolate applications from each other?
  • How to achieve an advanced deployment strategy?

Advanced kubernetes kinds

A lower-level concept called Replica Set is responsible for scaling out a pod to handle more traffic. This concept is a key for basic and more advanced deployment strategies like rolling upgrade (basic) or blue-green deployment. By extension of this capability is to provide automatic scalability using a horizontal pod autoscaler, where the server changes the number of replicas for a given pod. Contrary to guaranteeing some application availability running in a pod, you can define a pod disruption budget that describes the rules of how pods can be changed.

Kubernetes deployment isolations

Every deployed object to kubernetes is deployed to a namespace which acts as a logical separation of deployments in a single cluster. If a namespace is not specified, then the default namespace is used. System namespaces are also created, e.g. kube-system or kube-public. Those are used for deployments supporting kubernetes cluster operations. 

To isolate deployments on the network level, you need to specify a network policy. Network policy allows you to restrict how a pod is allowed to communicate with various network entities. 

Conclusion

In this post, we briefly touched all core concepts in Kubernetes that developers should be aware of to build a secure, stable and resilient solution. The information loads this post, and we often oversimplified the concept to make it digestible for newcomers. Please, let me know if I missed some vital concept or oversimplified something that deserves a more detailed explanation or is not clear enough. You can leave a comment here or reach me on Twitter

Processing…
Success! You're on the list.

Continuous Integration/Continuous delivery(deployment) tools overview

For any software development team is critical to delivering value as quickly as possible, safely and reliably. It is proven that speed of delivery is directly correlated with the organisation performance (see, e.g. State of DevOps report. So the delivery process influence company valuation and is critical for scaling the engineering effort withholding the desired quality of the product. How to achieve this is one of the cornerstones of DevOps and SRE. To get an idea of how the modern software delivery works in a successful company, see how delivery pipeline works in AWS.
This blog post is by no means a replacement for deep-dive specialised or best practice literature, e.g. Continous Delivery, Continous Integration but rather an evaluation of the current tooling landscape which can help in achieving project goals. No need to mention that tool alone won’t make the magic happen without correct delivery pipeline design. But in the post, we will focus solely on the tooling.

CI/CD key terms clarification

Continuous integration

Continuous integration (CI) is the practice of automating the integration of code changes from multiple contributors into a single software project.

Continuous Delivery

Continuous Delivery (CD) is the ability to get changes of all types—including new features, configuration changes, bug fixes and experiments— into production, or into the hands of users, safely and quickly in a sustainable way.

Continuous deployment

Continuous deployment (CD) is a strategy for software releases wherein any code commit that passes the automated testing phase is automatically released into the production environment. It is paramount to software delivery processes. 

The delivery process is critical in any software company. From my perspective and experience current state is far from being “solved”, and the number of tools appearing every year confirms that. The amount of money spend by VCs is just confirming that. The majority of tools are imperative, while the next big trend seems to be a “declarative” CI/CD tooling. Curious about what the future will bring.

CI/CD tools available

Wide variety of tools available (by no means list is extensive):

Selection criteria

Our selection and evaluation criteria base on our current and future needs:

  • cost-effective (auto-scaling workers, etc.)
  • cost of maintenance
  • speed of development/ability to contribute
  • manual approval stage
  • ability to pass certification (audit-ability, permission and roles, etc.)
  • multi-cloud support
  • support VMs + kubernetes deployments + potentially serverless
  • ability to integrate Infrastructure as Code to delivery pipeline
  • do not scratch all our development infra (keep in mind cost/benefit ratio)
  • majority of our workloads are running in GCP
  • deals with mono-repo
  • support for long term support (LTS) branches

CI/CD tools shortlist

Following tools made it into shortlist for evaluation and deep dive. See dedicated post for each of those:

Summary

Our ideal solution would be tooling provided by our primary cloud provider, which meets our current and near feature needs and is fully managed. We partially matched that with a combination of Cloud Build and Spinnaker for GCP based on tutorial provided by GCP.
Generally, my impression from the study and evaluation of tools listed is that claim of “full CI/CD” support are neither great in CI nor CD and lay somewhere in the middle. They provide a platform a let you code the rest. Another pain point is to tackle the monorepo and provide a means to be efficient. Platforms seem to be somewhat pricy, and the amount of infra work needed is not that low to justify it when providing all necessary features. Curious about what the Harness will provide in this space.
Not promoting the combination with end up with but was clear win moving away from Concourse CI. Where missing resource management for stages was a total killer, insufficient authorisation and role management and absence of manual steps was clear do not continue this journey. For a fresh new project, a GitLab would be a brainer to start with. It provides all needed for development, but when the project grows significantly, it can become pricy, and you are motivated even by GitLab to move partially to your infrastructure. Needless to say, that setup requires some amount of work, especially proxying and create network waypoints.
If you have some experiences with tools evaluated or disagree with the points, please use the comment section to share your view and don’t forget to like and follow me on Twitter!

Processing…
Success! You're on the list.

Continuous Delivery with Spinnaker – tool evaluation

Spinnaker one of the popular continuous delivery platform originally developed in Netflix. I am evaluating a version 1.23.5 . Spinnaker is a multi-cloud continuous delivery platform supporting VM and Kubernetes based deployments (server-less under development). Extensible platform with HA setup possible. This post is supposed to be part of the bigger series with a unified structure.

Spinnaker overview:

Spinnaker Architecture
Spinnaker basic concepts (Spinnaker started for VM deployments, Kubernetes concepts mapped to it in provider)
Pipeline stages
– Support for manual Judgement stage though no detailed permission model for actions (non OSS plugins exists e.g. Armory)
– Nesting pipeline supported (either fire and forget or wait for completion)
Custom stages development (Rest call, Kubernetes job or Jenkins job, …)
– Development of new stage

Authentication & Authorisation (Spinnaker security concepts):
Spinnaker Authentication
Spinnaker Authorisation with Role Based Access
– Spinnaker can be accessed through GCP Identity Aware Proxy (or other service on different cloud providers)
– Authentication G-Suite identity provider or GitHub teams. Other options exist as well, see overview here.
– Authorisation with Google Groups (only support flat structure, role = name of the group), GitHub teams , raw mapping or others
Pipelines are versioned automatically
Pipeline triggers
– Concept of providers which integrates pipelines with target platform or cloud providers, e.g. Kubernetes provider v2
– Support for complex deployment strategies
– Management CLI – Halyard (spinnaker configuration) and Spinn for pipeline management
– Deployment to Kubernetes in the form of native manifests, Helm packages transformed in Helm Bake Stage to native manifests (using native Helm support for templating)
– Terraform stage as a custom stage e.g. oss implementation
– Wide variety of notification options
– Monitoring support via Prometheus
Backup configuration to storage

Spinnaker pricing:

– There is no price for Spinnaker itself only for resources consumed when deployed
– Requires VMs, Redis or CloudSql(Postgress)
– Loadbalancer
Spinnaker for GCP if you are running on GCP, where you pay for resources needed only.

Resources:

https://spinnaker.io/
https://www.slideshare.net/Pivotal/modern-devops-with-spinnaker-olga-kundzich
https://spinnaker.io/concepts/ebook/

Summary:

Tool with focus on CD with manual approval stages, security model which makes it SOC2 compliant. Good audit-ability in place (possible to integrate to GCP audit log). Scripted stages and manual approval stage is possible to specify just a group. It is done on application/ pipeline level. Tool eliminate Helm from kubernetes cluster as it works based on Kubernetes native manifest. Propagates Immutable infrastructure as those artefacts are stored for possible rollbacks.  Authorisation/Authentication seems to be a complex but variable to integrate with wide variety of the systems. Pretty active user group, offering help. Pricing is based on resources used.

Continuous integration/delivery with GitLab – evaluation

GitLab one of the popular DevOps platform out there, currently. I am evaluating a version GitLab 13.7-pre- release features. This post is supposed to be part of the bigger series with a unified structure. Evaluation in the context of existing infrastructure GitHub + Prometheus + Grafana.

GitLab main components: 

Authentication and Authorisation with GitLab:

GitLab continous integration and continous delivery capabilities:

  • You need a runner (self hosted, or shared GitLab Runners ) where you can hit limits/costs 

Pipeline definition

Pipeline additional features

GitLab Pricing model:

  • Has the concept of minutes in the plan + buying extra ($10 per 1000min)
  • Pay for the storage $60/10GB  see details
  • strong push towards Premium with the cost $19/user/month.
  • GitLab pricing

Conclusion

I haven’t studied GitLab offering super profoundly, but for building a new project, I would consider starting with it as it provides complete SDLC support (compared to Spinnaker it is CI + CD). Acts as SDLC management on top of the cloud provider – providing an easy way how to comply with the majority of measures from certification, e.g. SOC 2, but those are the gold plan features ($99/user/month). This might be pricy, but if you use ticket management, documentation (instead of, e.g. Jira), roadmap tooling, release notes management, Terrafrom stage seems like a no-brainer!

Challenges you might hit when growing:

  • Pipeline deployment ordering as parallel pipelines run
  • Shared runners are small machines step to registered add admin infra work
  • A security model is similar to Spinnaker, additionally doesn’t allow custom groups, but I guess that you can create custom apps (users)
  • Pricing seems scary at the end runners probably run on your infra and registered to the platform, OTOH if managed to keep on shared runners, need to buy a lot of build minutes. 
  • Storage cost seems high 
  • Docker registry has 30 days expiry (probably can be extended) => you will be uploading to your GCR

I haven’t studied in deep deployment capabilities:

  • Integration with Helm – probably rendering via helm template and then deploy
  • Support for deployment strategies – requires appropriate kubernetes object manifests as everywhere
  • Registered kubernetes seems to have an agent running in them
  • Has all concepts from Spinnaker more less
  • Has starting support for Terraform in alpha

GitLab Potential pain points:

  • Having a whole pipeline in git(including deployment strategies configurations, approvals) – might pose challenges when there is no pure trunk-based development – requires a need for backporting and harder for surveillance. 

GitLab is built on top of plenty of OS projects where I can imagine that integration between your infrastructure and GL might be extensive.

The only reasonable scenario that you fully migrate to GitLab and reduce extra tooling like Assana, GitHub, Confluence, … or for new projects that might be a no-brainer. That migration can be pretty heavy, but you might get some compliance checks for that in a single workspace. 

Resources for more detail GitLab overview

Continuous integration with GCP Cloud Build – evaluation

Cloud Build one of the services available on Google Cloud Platform. Evaluation happened in January 2021 and I believe that is still improving. This post is supposed to be part of the bigger series with a unified structure.

GCP Cloud Build main features:

  • Even though Cloud Build labels itself as CI/CD tool it lacks the CD features (e.g. deployment strategies, manual approval stages etc.) – nobody prevents you from developing those
  • Run in GCP or has some support for local execution as well
  • Build using wiring Docker containers together. Executed on single VM, you can upscale VM to high cpu machines up to 32cpu. 

Cloud Build Continous Integration features:

Google Cloud Build Pricing:

Conclusion:

Purely CI system with the capability to build (~ Cloud Build). No triggers for time-based related things. So either Event-based (commit, tag, …) or manual trigger. Probably could be emulated via Cloud Function to trigger to simulate Time Based Trigger. Has the ability to run locally which is nice. Scales up to 32cpu machines. Prices based on build time (clock time). Doesn’t offer Approval stages, security model based on IAM and seems that you cannot grant permission on a particular configuration/build. Doesn’t have a concept of a pipeline – but rather a set of tasks steps(stages). Definition lives in Git – so LTS branches should be buildable. To have full end-2-end deployment, you need a CD system. This system manages just “build artefact”. 

Continous integration and delivery with Jenkins – evaluation

Jenkins Evaluation happened in January 2021 and I believe that Jenkins is still improving. This post is supposed to be part of the bigger series with a unified structure.

Jenkins features overview:


Pipeline definition completely lives in GIT together with code ~> Jenkinsfile
– Support for jenkinsfile via graddle DSL
You can chain the pipelines
– Single pipeline triggered on various branches ~> Multi-branch pipelines (tutorial)
Parallel pipeline stages
– Access to build meta-data (e.g.  build-number, commit hash, …)
Jenkins as a code plugin
– Managing secrets via secrets plugin
Audit trail plugin
Try notifier
– Better UI with Blue Ocean
– Tooling – Jenkins Job Builder (Job builder tutorial)
Pull-request Jenkins pipeline
– Deployment topology – master x slave/agent
Jenkins Helm deployment – seems has autoscaling agents – based on Configuration as a code plugin
– Manual approvals – seems as not so straightforward via input option
Jenkins on Google Kubernetes Engine

Security model:


– Default has no roles – all has single view -> plugins
GitHub OAuth and here
Role base authorisation plugin –  (strategy plugin – role) – that probably doesn’t work together with gitHub OAuth, but can work with Matrix access

Resources:


Jenkins for beginners

The security model has various options not sure how all fits together e.g. GitHub OAuth + Roles and Securities but there are multiple ways e.g. control matrix. 

Has the concept of pipelines and jobs. Pipelines are next generation where they live completely in code-base ~> LTS should be ok. Seems that have some basic manual approvals stages, question how that goes together with auth. Has the concept of multi-branch jobs/pipelines = single definition for the whole bunch of branches where the definition is dynamically taken from the source. 

CD capabilities are somewhat simplistic – no advanced release strategies. Like rollback, monitoring etc. That would need to be scripted probably.

Complete Guide: Kubernetes Helm operational modes

Helm, a package manager for kubernetes, went through some evolution in the past several years. It evolved from Helm 2 to Helm 3, where helm 2 went through end-of-life nearly a year ago so I would be pretty late to the party. Without going too deep into helm internals I would mention just the main feature.

Kubernetes Helm 3 main differences

Helm tiller, goodbye we won’t miss you

The removal of Tiller, a component that acted as a middle man and caused many troubles (requiring cluster around for many helm commands, security as tiller run as Kubernetes RBAC cluster-admin, etc.) is now gone! And many more, if interested official pages provide a good summary of helm 3). In this short blog post, I would like to give a quick overview of how Helm 3 works from a high-level perspective and what are the potential Helm operational modes and risks associated.

Helm 3 Architecture overview

Helm 3 architecture is lightweight (compared to helm 2) schematically described in the following picture.

helm 3 internals
  • Helm binary installed on the client machine interacting with kubernetes cluster api. 
  • Helm metadata objects stored either as ConfigMap or Secret kubernetes object (depends on the configuration options)

Helm binary provides a cli to helm. The main function is to render manifests based on the Helm manifests templates and apply them to kubernetes cluster with preserving the revision history for possible rollbacks via helm cli. In addition, helm metadata objects whose payload is a serialized protocol buffer contains all data to render requested kubernetes manifests based on helm package specification and provided value file which acts as variables to helm package. You can list a history of helm release via (e.g. prometheus deployment in namespace prometheus):

$ helm history prometheus -n prometheus
REVISION	UPDATED                 	STATUS    	CHART            	APP VERSION	DESCRIPTION
113     	Fri Apr 23 12:55:11 2021	superseded	prometheus-11.0.0	2.16.0     	Upgrade complete
114     	Wed Apr 28 13:18:29 2021	superseded	prometheus-11.0.0	2.16.0     	Upgrade complete
115     	Wed Apr 28 13:49:13 2021	superseded	prometheus-11.0.0	2.16.0     	Upgrade complete
116     	Wed Apr 28 15:23:38 2021	superseded	prometheus-11.0.0	2.16.0     	Upgrade complete
117     	Wed Apr 28 17:03:15 2021	superseded	prometheus-11.0.0	2.16.0     	Upgrade complete
118     	Fri Apr 30 16:50:13 2021	superseded	prometheus-11.0.0	2.16.0     	Upgrade complete
119     	Mon May  3 16:10:01 2021	superseded	prometheus-11.0.0	2.16.0     	Upgrade complete
120     	Fri May  7 11:49:50 2021	superseded	prometheus-11.0.0	2.16.0     	Upgrade complete
121     	Fri May 14 15:06:13 2021	superseded	prometheus-11.0.0	2.16.0     	Upgrade complete
122     	Thu May 20 10:45:56 2021	deployed  	prometheus-11.0.0	2.16.0     	Upgrade complete

and find corresponding secrets in the namespace where the package is being applied

$ kubectl get secrets -n prometheus
NAME                                                  TYPE                                  DATA   AGE
sh.helm.release.v1.prometheus.v113                    helm.sh/release.v1                    1      52d
sh.helm.release.v1.prometheus.v114                    helm.sh/release.v1                    1      47d
sh.helm.release.v1.prometheus.v115                    helm.sh/release.v1                    1      47d
sh.helm.release.v1.prometheus.v116                    helm.sh/release.v1                    1      47d
sh.helm.release.v1.prometheus.v117                    helm.sh/release.v1                    1      47d
sh.helm.release.v1.prometheus.v118                    helm.sh/release.v1                    1      45d
sh.helm.release.v1.prometheus.v119                    helm.sh/release.v1                    1      42d
sh.helm.release.v1.prometheus.v120                    helm.sh/release.v1                    1      38d
sh.helm.release.v1.prometheus.v121                    helm.sh/release.v1                    1      31d
sh.helm.release.v1.prometheus.v122                    helm.sh/release.v1                    1      25d

Helm operational modes

Helm package management mode

When you upgrade or install package, Helm render the manifests (performs manifest api validation) and apply them to kubernetes cluster api. Kubernetes api performs upgrades, fill in missing default options, may silently ignore unrecognised or wrong settings (depends on configuration). Lower level kubernetes objects are derived from higher-level objects, e.g. replica sets from deployments. All this results in a manifest that is actually running in the kubernetes cluster as depicted in the picture. When you ask Helm to provide a manifest via

helm get manifest release-name -n namespace

Will provide deployed kubernetes manifest. Requested kubernetes manifest that reside in kubernetes Helm secret metadata. That is not exactly what is running in the cluster. To get the manifests that are actually running in the cluster.

kubectl get all -n namespace

This command will provide all kubernetes objects, including derived that are running in the cluster. By comparing those two, you can see differences. If you consider that kubernetes cluster is over time upgraded as well that you realize that what is actually running in the cluster can be actually surprising. That surprise usually manifests during disaster recovery. That is the reason why is it is highly preferred to eliminate Helm abstractions for the deployment chain. Kubernetes natively supports versioning via the revision history feature, which is specific to kubernetes object, e.g. deployment.

kubectl rollout history deployment deployment_name

This command captures only actual differences in the deployment manifest, so the revision count might not be the same as the number of revisions from Helm. Also, Helm revision history bundles all the kubernetes objects into a single revision.

Helm templating mode

To move to deployments of native kubernetes manifests, Helm offers a feature to render the manifests using a package and value file via helm template command. That completes the picture of how Helm operates. A simplified view could be summarised into:
1. render manifests
2. kubectl apply rendered manifests
3. store the helm revision metadata

Helm 3 provides good flexibility for deployments and leaves important decisions to SREs while keeping access to community-maintained packages.

TIP: If you develop some helm packages in-house, adding a helm lint command to your PR checks allows discovering issues during the PR review process. Don’t forget to check helm advanced features

Do you use Helm at all? What is your preferred way? Share your experience here or reach me at @jak_sky and don’t forget to join.

Processing…
Success! You're on the list.

Posted in Uncategorized | 1 Reply

Developers path to seniority

What seniority means for a software engineer? Is it familiarity with frameworks, libraries or something different? In this post, I will try to summarise my perspective on how it is changing for me. Got a lot of view during the last three years when I have lead or participated in a decent amount of interviews for engineering roles, including the C-level executives. Let state the obvious: fair and good hiring is super hard. During the hiring process, you try to assess the seniority of the candidate(and other qualities for sure) according to the company career ladder. As a reference, industry-respected and well-known ladder description can be used Google career ladder. If you haven’t had an opportunity to familiarise yourself with it, take the time and do so, it is definitely worth understanding. Google career ladder construction anchored in Google perfect team study. This post doesn’t attempt to mimic Google research but rather provide a starting point and raise curiosity. Excellent management is where the resulted outcome of the team is far greater than the pure sum of individual contributions. 

Seniority levels

Seniority levels are usually a combination of technical “hard” skills and other skills collectively referred to as “soft” skills. Unfortunately, relatively few companies go beyond this level of explanation. 

Junior level is characterised by a strong desire to learn new tools, frameworks and techniques. Often connected with black and white view on problems and when solving a task, junior developers can come up with a single possible solution or more with slight modifications. It is nothing wrong to be at that stage, and healthy teams often contain some junior developers as they bring fresh trends and passion to the teams. However, having more than 25% of junior developers in the team is challenging as they require more attention and slows the team down or affect the quality. Be careful with this mix.

Gaining seniority

Gaining seniority goes on a few axes – technical skills, context developer is using during the evaluation of possible solutions and ability to communicate effectively. Junior developer has limited technical skills, and his context is limited to code he is writing and communicates solely in terms of code, requirements or tickets. Context is a vital vehicle for guiding a developer in two remaining axes. As technical skills are growing number of the possible solution raises as well. Context can be divided but not limited to the following scopes:

Codebase

Limits the knowledge to the current codebase, used technologies and design principles and thinking in those low-level terms. This definition can be confusing as project codebase is involved every time as the ultimate source of truth but what differs is the level of abstraction. Developers are growing by operating bigger codebase and experience on different project codebase.

Development habits and practices

This area covers topics like where to apply which kind of tests. Where are the areas you can compromise if chasing time, and what are the real costs? Tech debt management. Essential features for long term supportability. Those items can be categorised under some risk management and damage control practices.

System design

Designing a system for performance, scalability, security and similar system-wide aspects. Defining thread zones and expected failure scenarios. Think in terms of consistency and ability to enforce those policies on the platform level. What can be handled on infrastructure level vs what is necessary to address in the application code?

Different mindset or roles

Understanding of other functions and associated mindsets of people participating in the development process (system engineers, quality assurance, machine learning engineers, project managers, etc.). What helps the best in this area is to try out the majority of those roles. Getting the role mindset will simplify communication during cross-team communication.

Software development life cycle

Ability to foresee and expect requirements which might not be implicitly obvious or stated in the desired functionality description. Understanding of product lifecycle stages starting from ideation till end-of-life. An item like supportability, troubleshooting etc. What helps in those aspects is to take the perspective of technical support personnel and think in terms of what-if. How difficult would it be to discover that component/feature X doesn’t work as expected.

Technology overview

Knowledge of technologies and alternatives gives you lego blocks for building a final solution architecture. This is especially important for the cloud-based product as you are trading a cost for a speed of delivery. Similarly, the same applies to programming languages. Those have specific features, design patterns etc. 

Cross disciplines

This context is pretty similar to `Different mindset roles` with an only difference; it is focused on actual skills necessary in those roles and effects the tools have on team dynamics. Disciplines like development, operation, infrastructure, marketing and similar. 

Cross-level and cross-department awareness

Understanding main objectives, areas of competence and levels of abstractions those people operate on. Unfortunately, even though role titles repeat competencies and responsibilities differs significantly between companies. That is what makes the execution different for each company and is one of the secret sauce of success. Effects are visible in accounting and balance sheets. 

Management and leadership skills

Guide the team without command and control approach. Leading the change throughout the team, getting the buy in to support the change and move things forward.

Business domain

Understanding of industry you operate in helps you to drive better value for your customers by combining your technical abilities with domain knowledge.

Business models

Understanding how the business makes money on the product you build helps you to understand key aspects of the technical solution in terms of desired points of flexibility, scalability and cost management.

Wrap up

Knowledge and experiences in those scopes provide a better context for making decisions in the bigger picture and finding a more strategic solution for given conditions. Helps you to drive communication more effectively as you can think more like your counter-party and understand his point of view. Lastly, you should be able to come up with a plan of delivery iterations with a value-added in each iteration and mitigated risk. 

The more senior you get on technical skills and proceed on the career ladder, the more the role start rely on your leadership skills. The vast amount of companies than forces people to manager roles but some (including Google, Facebook, etc.) allows to continue on technical track and label those positions as Principal or Staff Engineers. The role of those engineers is usually to improve the engineering culture and best practices of the teams apart from solving complex engineering tasks. 

I neglected at least one aspect in my writing, the effect of personal characteristics and perspectives for particular roles. I am not going into those but instead refer to great Neil blog with people topologies

What’s the number one lesson you’ve learned since starting in tech as a junior developer? Tweet me @jak_sky and share your story.

Resources for further study

Building Secure and Reliable Systems: Best Practices for Designing, Implementing, and Maintaining Systems

Accelerate: The Science of Lean Software and DevOps: Building and Scaling High Performing Technology Organizations

Team Topologies: Organizing Business and Technology Teams for Fast Flow

The Five Dysfunctions of a Team

Managing Humans

The Invincible Company

Value Proposition Design: How to Create Products and Services Customers Want

The Business Model Navigator

If you like the content or have some experiences or questions don’t forget to leave a comment bellow and follow me on Twitter.

Processing…
Success! You're on the list.

Best practices: Scaling infrastructure as code in the team with terraform

Terraform introduction

HashiCorp Terraform is a popular tool for managing your cloud infrastructure as code (IaC) in a cloud-agnostic way (same tool for various cloud platforms). Instead of unifying all capabilities for different cloud platforms, the core concepts are exposed to the end-user via Terraform provider concept. Terraform offers providers for all major cloud vendors and other cloud services and technologies as well, e.g. Kubernetes.  

This blog post doesn’t aim to be an introduction to Terraform concepts (official documentation is quite ok) but instead sharing an experience with using a Terraform in a distributed team, tools that come in handy and all things that make life easier. Even though HashiCorp offers Terraform Enterprise this option is used quite rarely at least on “small/er” projects so we won’t be discussing this option here. I openly admit that I have zero experience with this service so I cannot objectively compare. I will solely focus on using the open-sourced part of the project and Terraform version 0.12.x and higher. 

Terraform state

Terraform maintains the state of the infrastructure that manages in the state file. Format of Terraform state file is version dependant without strict rules on version compatibility (at least I wasn’t able to find one that was reliably followed and guaranteed). Managing state files poses two main challenges:
1) manage/share state across the team
2) control/align the version used across the team

The first aspect, different teams solve differently. Some commit state file alongside the configuration to the version control system which is far from ideal as there might be multiple copies of such resources across the team and requires some team coordination. On top of that, state file contains sensitive information which is impossible to mask and such doesn’t belong to the source control system. A lot better approach is using Terraform remote backend, which allows a true concurrent approach. Capabilities depend on the concrete implementation used. The backend can be changed from local to remote easily as is migrated automatically. The only limitation is that merging and splitting state file is allowed only for the locally managed state. 

Terraform version lock

Managing Terraform version management is centred around providing frictionless version upgrades for different Terraform configurations that align across the team with assuring that state file won’t get upgraded accidentally. To make sure that your state file won’t get upgraded accidentally put version restriction to every configuration managed e.g.

terraform {
  required_version = "0.12.20"
}

TFENV introduction

To align the team on a uniform Terraform version for every single configuration managed use tool for Terraform version management, e.g. tfenv. Put the desired version of to .terraform-version file located in the folder together with configuration. Tfenv automatically switches to appropriate version as needed, when new version encountered you need to run tfenv install to download a new version. If you want to check version available:

$ tfenv list
* 0.12.20 (set by /Users/jakub/test/terraform/.terraform-version)
  0.12.19
  0.12.18

As the number of resources or organisation grows so does the state file. Which leads to increased time for configuration synchronisation and competing for a lock on a remote state file. To increase the throughput and allow team DevOps mode(clear ownership of the solution from end to end), you might want to divide the infrastructure and associated state files into smaller chunks with clear boundaries. To keep your configuration DRY hierarchical configuration tools like Terragrunt comes to the rescue and reduce repetition. 

Terrafrom code validation and formatting

A growing number of users poses challenges as well as benefits which are the same as on application code written in, e.g. java or any other programming language. What is the real motivation for Infrastructure as a Code (IaC). How to setup standards and best practices on the project? Terraform offers a bunch of tools embedded. To make sure that code is properly formatted according to standards use fmt utility, which is pluggable to your CI/CD pipeline or pre-commit hooks.

terraform fmt --recursive --check --diff

For your re-usable Terraform modules it is good to make sure they are valid though it doesn’t catch all the bugs as it doesn’t checks against cloud APIs, so it doesn’t replace integration tests.

terraform validate

Terraform operation

Getting an idea of what will change, diff of your current infrastructure against proposed changes can be easily achieved via the generated plan

terraform plan

Static security scanning – infrastructure security

Enforcing security and standards are a lot easier on IaC as you can use tools like tflint or checkov which allows writing custom policies. We conclude the tool section with awesome Terraform tools which provide a great source if you are looking for something specific.

Conclusion

In this blog post, we just scratched the surface of Terraform tooling and completely skipped design and testing, which are topics for separate posts. What are your favourite tools? What did you find really handy? Leave a comment, share your tips or you can ask me on twitter.

Processing…
Success! You're on the list.

How to setup Prometheus dead man’s switch

Teams invest significant effort in making their solution transparent, easy to troubleshoot and stable by instrumenting their product and technology which is then connected to their monitoring system (e.g. Prometheus as one of the popular solutions). The only question remains: Who monitors the monitoring? If the monitoring is down you won’t get any alarms about the malfunction of the product and you are at the begging. So you add monitoring of a monitoring system. Availability tough game starts. If both components have 95% availability you effectively achieve 90%. I believe that you got the rules of the game we play.

Dead man’s switch

How it is monitoring of monitoring setup in practice? Well, the implementation differs. But the core idea is the same and works well even in the army! It is called Dead man switch. It is based on the idea that if we are supposed to receive a signal for triggering an alarm in an unknown moment we need to guarantee that the signal can trigger an alarm anytime. Reversing the logic for triggering the alarm will give us that guarantee so having a signal which we receive constantly and the alarm is triggered when we don’t receive a signal. So simple! This principle (heartbeat) is used in multiple places e.g. clustering. In the army, they use it as well.

dead-man

Prometheus dead man switch

Some monitoring tools they have this capability built-in but Prometheus doesn’t. So how to achieve this in order to sleep well that the watcher is watching.

Prometheus alert rule

We need to set up a rule that is constantly firing in Prometheus. There can be a rule like this:

    - name: monitoring-dead-man
      rules:
      - alert: "Monitoring_dead_man"
        expr: vector(1)
        labels:
          service: deadman
        annotations:
          summary: "Monitoring dead man switch should always fire alert"
          description: "Monitoring dead man switch for probing alert path"

where service label will be used further in the next step (or similar alternative).

Alertmanager dead man switch Route

Now we need to create a heart beating. The rule on its own would fire once then it would be propagated to Prometheus Alert Manager (component responsible for managing alerts) and all would be over. We need a regular interval for our check-ins. Interval is given by availability you want to achieve as that all adds to reaction time you need. You can achieve this behaviour by special route for your alert in an Alert Manager:

      - receiver: 'DEAD-MAN-SNITCH'
        match:
          service: deadman
        repeat_interval: 5m

Dead man snitch Reciever

Now we need to achieve an alarm trigger reverse logic. In our particular case, we use Dead Man Snitch  which is great for monitoring batch jobs e.g. data import to your database. It works in a way that if you do not check in in the specified interval it triggers with the lead time given by interval.

Dead_Man_Snitch

You can specify the rules when to trigger but those are the details of the service you use. All you need to add to Prometheus is a receiver definition checking in particular snitch as follows:

       - name: 'DEAD-MAN-SNITCH'
          webhook_configs:
            -  url: 'https://nosnch.in/your_snitch_id'

URL is taken for created snitch as an example here

Snitch_url

Pagerduty dead man’s switch

The last thing you need to do is integrate the trigger with the system you use for on-call rotta management e.g. PagerDuty . For this example integration between dead man snitch and pagerduty or you can integrate it via pager duty email trigger but that will be less reliable as it can change unnoticed. 

pagerduty_email

Summary

Prometheus doesn’t have heartbeat service by default but we achived a desired functionality by using functionality of alert manager for resending alerts in combindation with 3rd party service which reverse the trigger logic. Let me know if is it working for you or whether you fund a better way how to achive the desired functionality. You can leave a comment below or you reach me on twitter.

Processing…
Success! You're on the list.

Helm features I would wish to know from day one

Helm package manager

Kubernetes Helm is a package manager for Kubernetes deployments. It is one of the possible tools for deployment management on Kubernetes platform. You can imagine it as an RPM in Linux world with package management on top of it like an apt-get utility.

Helm release management, ability to install or rollback to a previous revision, is one of the strongest selling points of Helm and together with strong community support makes it an exciting option. Especially the number of prepared packages is amazing and make it extremely easy to bootstrap a tech stack on the kubernetes cluster. But this article is not supposed to be a comparison between the kubernetes tools but instead describing an experience I’ve made while working with it and finding the limitations which for some else might be quite ok but having an ability to use the tool in those scenarios might be an additional benefit.
Helm is written in GO lang with the usage of GO templates which brings some limitation to the tool. Helm works on the level of string literals, and you need to take care of quotation, indentation etc. to form a valid kubernetes deployment manifest. This is a strong design decision from the creators of the Helm, and it is good to be aware of it. Secondly, Helm merges two responsibilities: To render a template and to provide kubernetes manifest. Though you can nest templates or create a template hierarchy, the rendered result must be a Kubernetes manifest which somehow limits possible use cases for the tool. Having the ability to render any template would extend tool capabilities as quite often the kubernetes deployment descriptors contain some configuration where you would appreciate type validation or possibility to render it separately. At the time of writing this article, the Helm version 2.11 didn’t allow that. To achieve this, you can combine Helm with other tools like Jsonnet and tie those together.
While combining different tools, I found following Helm advanced features quite useful which greatly simplified and provide some structure to the resulting Helm template. Following list enumerates those which I found quite useful.

Useful Helm advanced features

Template nesting (named templates)

Sub-templates can be structured in helper files starting with an underscore, e.g. `_configuration.tpl` as files starting with underscore doesn’t need to contain valid kubernetes manifest.

{{- define "template.to.include" -}}
The content of the template
{{- end -}}

To use the sub-template, you can use

{{ include "template.to.include" .  -}}

Where “.” passes the actual context. When there are problems with the context trick with $ will solve the issue.

Include file

To include a file all you need is specify a path

{{ $.Files.Get "application.conf" -}}

Embed file

Embedding file as configuration

{{ (.Files.Glob "application.conf").AsConfig  }}

it generates key-value automatically which is great when declaring a configMap

Validate input and fail quickly

To provide a reasonable error message and make some config values mandatory, use required function

{{ required "Error message if value not specified" .Values.component.port }}

Escaping dots

Accessing a key from value file which contains a dot e.g. application.conf

{{- index .Values.configuration "application.conf" }}

Combined logical expressions

IF statements combining multiple values

{{- if or (.Values.boolean1) (.Values.boolean2) (.Values.boolean3) }}

Wrapping reference to value into braces solves the issue.

Definitevly I didin’t list all features but those I see as a moving a code and structure to the next level. Do you fell that I have missed some? Please let me know here in the comment section or reach me on twitter.

Processing…
Success! You're on the list.

Java HotSpot JIT optimisation techniques

HotSpot Java

After a JVM JIT overview, I put together a list of important techniques used by HotSpot JVM JIT compiler as I discovered them during my study in this area. Neither it has the ambition to provide an exhaustive list of techniques nor providing a deep expertise on a particular topic. The level was set to just understand the technique. Each section has links I found pretty useful in my study of the subject.
Described techniques in this article are based on Oracle HotSpot JVM implementation, but it should also be valid for OpenJDK and VMs based on that at least in a limited scope.

HotSpot JIT technigues

Majority of the described methods are dependant on runtime information collected by VM during execution and stored in ephemeral method data objects.

method inlining

Is a base optimisation technique which can enable more sophisticated and complex techniques later on as it brings related code closer together. It eliminates the cost associated with calling a method as it copies a body of the called method in a place from where it was called. HotSpot places some restrictions on which methods can be inlined as, e.g. bytecode size of the inlined method, the depth of the method in the current call chain, etc. For the exact list see HotSpot VM options. An earlier post contains detailed method inlining example including evaluation of the performance gain.

loop unrolling

Reduces the number of jumps back to the loop body beginning. Each jump can have an adverse effect on the CPU as it dumps a pipeline of incoming instructions. It eliminates the cost associated with branch prediction and removes safe point polls which are typically added at the end of each loop iteration. The shorter the loop body the higher the penalty for the back jump. This HotSpot performs decision on various criteria like type of loop variable, number of loop exit points, etc. Available benchmark showed that loop with integer loop variable was two times faster than with long. This cannot be taken as a rule of thumb but rather an idea about the possible impact of this optimisation. The behaviours differ between HotSpot versions, is dependant on CPU architecture and available instruction set. For more details check loop optimisation in HotSpot VM compiler

escape analysis

The sole purpose of this technique is to decide whether work done in a method is visible outside of the method or has any side effects. This optimisation is performed after any inlining has completed. Such knowledge is utilised in eliminating unnecessary heap allocation via optimisation called scalar replacement. In principle, object fields become scalar values as if they had been allocated as local variables instead. This reduces the object allocation rate and reduces memory pressure and in the end results in fewer GC cycles. This effect is nicely demonstrated in “Automatic stack allocation in the java virtual machine” blog post. Details can be also found in OpenJDK Escape Analysis.
Escape analysis is also utilised when optimizing a performance of intrinsic locks (those using synchronized). There are possible lock optimisations which and essentially eliminates lock overhead:

    • lock elision – removing locks on an object which doesn’t escape given scope. A great blog post from Aleksey Shipilёv on lock elision demonstrates the performance effects.
    • lock coarsening – merges sequential lock regions that share the same lock. More detailed information can be found in the post dedicated to lock coarsening
    • nested locks – detects blocks of code where the same lock is acquired without releasing

monomorphic dispatch

This optimisation relies on the empirical fact that in the authored code it is quite often that only one type is observed in receiver object. This optimisation essentially eliminates the cost of looking up method in vtables – removes invokevirtual bytecode instruction. This optimisation is also protected by a guard to ensure that no wrong code ever invoked. HotSpot also has bimorphic dispatch – pretty similar stuff just done with two classes. If there is a need to regain some performance it is possible to transform the code in a way that call contains just two types to take advantage of this optimisation.

intrinsics

Is the highly performant native implementation of the method known to JVM in advance rather than generated by JIT. They are used for performance critical methods and are backed by either special instruction provided by CPU or operating system. That means that they are platform dependent and some of them may not be available on all platforms. A decision about which optimisation to use might be deferred until runtime. Intrinsics are contained in .ad files of HotSpot OpenJDK source codes for example intrinsics x86 64-bit architecture. List of HotSpot available intrinsics is listed in vmSymbols.
Someone who would like to see more detail on intrinsic could find nice this blog post about POPCNT CPU instruction(x86 and amd64) utilised when Integer.bitcount including benchmark to get an idea about the performance impact. This presentation gives great insight into what does it mean to add a new intrinsic to HotSpot. The obvious fact is that you have to implement it in C++ with all the risks it brings it (no memory management and an issue can bring the whole VM down). Compared to Graal a new JIT compiler for JVM written in Java integrated via JVM Compiler Interface (JVMCI). As JIT is nothing more than just the transformation from bytecode to machine code. It brings a lot of benefits e.g. using standard Java tooling. Graal dramatically simplifies developing of custom intrinsics for specific hardware. For better understanding Graal I found Chris Seaton presentation pretty useful.

on stack replacement (OSR)

Is another term you might find when you start reading about JIT optimisations. OSR is just a technique for switching between two different implementations while it is running. This comes in handy in situations when some functions are invoked just once and could benefit from optimised version. When OSR happens a VM needs to be paused and replace the current frame with the new one which may have variables in different locations. For further info, I refer to an interesting post on On Stack Replacement whether is good or bad.

To see what JIT compilers perform during application runtime use JITWatch. Thanks to a newly gained understanding of JIT optimisations it should make a lot more sense what’s going on.

References for further study:
Useful JIT optimisation techniques
Java HotSpot performance engine architecture 

How to test performance of asynchronous web service with Gatling

In this blog post, I am not going to deep dive into application performance testing theory nor methodology but rather focus on explaining more advanced features of Gatling performance testing tool on the relatively common scenario when testing asynchronous service.

Case study – asynchronous service under test

Asynchronous service we are going to test in this post, report generation service, has following API specification:

  1. A report is requested for a given userId via POST method on /report endpoint and in the response request tracking reportId is returned
  2. Report status is tracked via GET method on /report/{reportId} when response status code is 202 Accepted it means that report generation is still in progress. 5xx status code means error during generation. When the report is done service returns 200 OK and the generated report.

Gatling performance test tool

Gatling performance testing tool allows you to create any testing scenario. Testing synchronous service is pretty simple:
– call the service with the request payload
– get the response
– assert the content.

Performance, in this case, is relatively simple: response time of single service, error rates etc. However, testing an asynchronous service is a bit more difficult as it cannot be done via a single call.

Gatling test structure for asynchronous calls

Testing scenario needs to follow the structure:

  1. request a service with given parameters and store id for this particular request
  2. poll the request status for tracing the progress
  3. download result when the request is completed

Performance of the service cannot be measured directly as processing is no longer bounded by a single call. What we would like to measure is processing time since the report is requested until processing is complete.

Test scenario can be nicely transformed into test scenario in Gatling DSL:

 val generateReport = scenario("Generate report")
 .exec(requestReport)
 .exec(pollReportGenerationState)
 .exec(getGeneratedReport)

Test step validations and Gatling session

Each test step contains validations that assure correctness of test scenario for a given virtual user. Test scenario relies on Gatling sessions which allow us to carry over user specific data between test steps. In this particular case, we need user specific reportId in order to track request progress and finally collect the report. ReportId is parsed from JSON Report generation response :

 private val requestReport: HttpRequestBuilder = http("Request report generation")
 .post("/report")
 .queryParamMap(withApiKey)
 .body(StringBody(reportRequestBody(userId, reportParameter)))
 .asJSON
 .check(status is 202)
 .check(jsonPath("$..reportId").ofType[String].exists.saveAs("reportId"))

Cope with asynchronous call – polling

Probably most interesting part is polling the report generation state where we need to keep a virtual user in polling mode until the report is ready. Again we are going to use Session in combination with asLongAs looping operator:

 private def notGenerated(sess: Session): Validation[Boolean] = {
val reportInProgress = 202
val generationStatus = sess("generationStatus").asOption[Int].getOrElse(reportInProgress)
logger.debug(s"Report generation status: $generationStatus")
generationStatus == reportInProgress
}

private val pollReportGenerationState = asLongAs(notGenerated)(
pause(100.millis)
.exec(
http("Poll report generation state")
.get("/report/${reportId}")
.queryParamMap(withApiKey)
.asJSON
.check(status saveAs ("generationStatus"))
)
)

Cope with asynchronous call – alternative

When working with asynchronous service another operator worth consideration is “tryMax”. The disadvantage of this operator is that request failed are counted towards failed requests what in our case would drastically falsify results. Silencing the request would erase this test step completely.

Collecting result of asynchronous call

Collecting report when is generated is pretty straightforward. In order to collect statistics on generating report scenario – time to get the report, we need to wrap the part of the scenario in group combinator which will result in group statistics for that group.

val generateReport = scenario("Generate report").group("Generation report completion"){
exec(requestReport)
.exec(pollReportGenerationState)
.exec(getGeneratedReport)
}

Summary

In this blog post, we used more advanced features of Gatling performance testing tool when testing asynchronous service using virtual users sharing important data between test steps via Session. Complete code snippet can be found on my GitHub gist. Let me know what is your approach when testing asynchronous service here or reach me on @jak_sky. If you have any suggestion how to support custom metrics in Gatling report don’t hesitate to share your wisdom in comment section below.

Processing…
Success! You're on the list.

Communication in distributed teams using Slack

Some time ago I wrote a post about tools I found useful when working in a distributed team. Working habits are changing and companies which grasp it will benefit from access to the broader talent pool and possible benefits when managed rightly. However, managing remote teams pose significant challenges. This post isn’t going to discuss how to structure teams or how to address araising challenges but rather focusing on things I found useful when working in a remote distributed team.

In the past years, Slack become defacto standard in this area even though I keep hearing from various teams that it didn’t meet quite their needs. If you have experience with the different tool I will be happy if you can share your experience in the comment section below the post.

Following section lists features I discovered really useful during working in a remote distributed development team.

  1. Snooze notifications –  to protect your focus time and boost your productivity. Break day to focus units where all distraction is disabled.
  2. Highlight words – can save your time to skim through unread messages available via Slack > Preferences > Notifications > My Keywordsslack highlight keywords feature
  3. Reminder tools – on each message you can set a reminderslack remind me about this feature
  4. To quickly start google hangout meeting – use command /hangout and the call will be initiated
  5. If you want to append ¯\_(ツ)_/¯ to channel – type /shrug command
  6. Use advanced slack search – start in search box with plus signslack advanced search
  7. Create Poll – use the command: /poll “Question?” “Option1” “Option2” “Option3” …slack simple poll
  8. Convert direct communication to a private channel. To direct communication must be included more than one party involved and the resulted channel is always private with no option to make it public. You can, later on, invite new participants with the option to see the channel history.slack direct message to private channel
  9. Channels for dedicated groups or around topics of interest are standard but what I found really useful is User groups feature which allows communicating with a group of people across the channels.
  10. Use stars to create an instant to-do list. You can mark any message or phrase with a star next to the time-stamp. It’s almost the same as bookmarking. Hint: if you mark messages with the task then you’ll get a personal to-do list which is really convenient to form during the conversation.

This concludes my top 10 slack features I found really useful while working in a remote distributed team. If you have other tips and tricks please let me know. Also if you found other useful tools please also share that experience in the comment section below.

Java performance tunning, make code JIT friendly

JIT watch introduction

In the previous blog post, we measured the effect of basic JIT optimisation technique – method inlining(out of other JIT optimisation techniques). The code example was a bit unnatural as it was super simple Scala code just for demonstration purposes of method inlining. In this post, I would like to share a general approach I am using when I want to check how JIT treats my code or if there is some possibility to improve the code performance in regards to JIT. Even the method inlining requires the code to meet certain criteria as bytecode length of inlined methods etc. For this purpose, I am regularly using great OpenJDK project called JITWatch which comes with a bunch of handy tools in regard to JIT. I am pretty sure that there is probably more tools and I will be more than happy if you can share your approaches when dealing with JIT in the comment section below the article.

Java HotSpot JITWatch configurations

Java HotSpot is able to produce a very detailed log of what the JIT compiler is exactly doing and why. Unfortunately, the resulting log is very complex and difficult to read. Reading this log would require an understanding of the techniques and theory that underline JIT compilation. A free tool like JITWatch process those logs and abstract this complexity away from the user.

In order to produce log suitable for JIT Watch investigation the tested application needs to be run with following JVM flags:
-XX:+UnlockDiagnosticVMOptions

-XX:+LogCompilation

-XX:+TraceClassLoading
those settings will produce log file hotspot_pidXXXXX.log. For purpose of this article, I re-used code from the previous blog located on my GitHub account with JVM flags enabled in build.sbt.
In order to look into generated machine code in JITWatch we need to install HotSpot Disassembler (HSDIS) to install it to $JAVA_HOME/jre/lib/server/. For Mac OS X that can be used from here and try renaming it to hsdis-amd64-dylib. In order to include machine code into generated JIT log we need to add JVM flag -XX:+PrintAssembly.
[info] 0x0000000103e5473d: test %r13,%r13
[info] 0x0000000103e54740: jne 0x0000000103e5472a
[info] 0x0000000103e54742: mov $0xfffffff6,%esi
[info] 0x0000000103e54747: mov %r14d,%ebp
[info] 0x0000000103e5474a: nop
[info] 0x0000000103e5474b: callq 0x0000000103d431a0 ; OopMap{off=112}
[info] ;*invokevirtual inc
[info] ; - com.jaksky.jvm.tests.jit.IncWhile::testJit@12 (line 19)
[info] ; {runtime_call}
[info] 0x0000000103e54750: callq 0x0000000102e85c18 ;*invokevirtual inc
[info] ; - com.jaksky.jvm.tests.jit.IncWhile::testJit@12 (line 19)
[info] ; {runtime_call}
[info] 0x0000000103e54755: xor %r13d,%r13d

JITWatch

We run the JITWatch via ./launchUI.sh
JITWATCH_config
to configure source files and target generated class files
JITWatch_configuration

And finally, open prepared JIT log and hit Start.

The most interesting from our perspective is TriView where we can see the source code, JVM bytecode and native code. For this particular example we disabled method inlining via JVM Flag “-XX:CompileCommand=dontinline, com/jaksky/jvm/tests/jit/IncWhile.inc

JITWatch_notinlined
To just compare with the case when the method body of IncWhile.inc is inlined – native code size is greater 216 compared to 168 with the same bytecode size.
JITWatch-inlined
Compile Chain provides also a great view of what is happening with the code
JITWatch_compileChain
Inlining report provides a great overview what is happening with the code
JITWatch-inlining
As it can be seen the effect of tiered compilation as described in JIT compilation starts with client C1 JIT compilation and then switches to server C2 compilation. The same or even better view can be found on Compiler Thread activity which provides a timeline view. To refresh memory check overview of JVM threads. Note: standard java code is subject to JIT optimizations too that’s why so many compilation activities here.
JITWatch_compilerThreads
JITWatch is a really awesome tool and provides many others views which don’t make sense to screenshot all e.g. cache code allocation, nmethodes etc. For detail information, I really suggest reading JITWatch wiki pages.  Now the question is how to write JIT friendly code? Here pure jewel of JITWatch comes in: Suggestion Tool. That is why I like JITWatch so much. For demonstration, I selected somewhat more complex problem – N Queens problem.
JITWatch_suggestion
Suggestion tool clearly describes why certain compilations failed and what was the exact reason. It is a coincidence that in this example we hit again just inlining as there is definitely more going on in JIT but this window provides a clear view of how we can possibly help JIT.
Another great tool which is also a part of JITWatch is JarScan Tool. This utility will scan a list of jars and count bytecode size of every method and constructor. The purpose of this utility is to highlight the methods that are bigger than HotSpot threshold for inlining hot methods (default 35 bytes) so it provides hints where to focus benchmarking to see whether decomposing code into smaller methods brings some performance gain. The hotness of the method is determined by the set of heuristics including call frequency etc. But what can eliminate the method from inlining is its size. For sure just the method size it too big breaching some limit for inlining doesn’t automatically mean that method is a performance bottleneck. JarScan tool is a static analysis tool which has no knowledge of runtime statistics hence real method hotness.
jakub@MBook ~/Development/GIT_REPO (master) $ ./jarScan.sh --mode=maxMethodSize --limit=35 ./chess-challenge/target/scala-2.12/classes/
"cz.jaksky.chesschallenge","ChessChallange$","delayedEndpoint$cz$jaksky$chesschallenge$ChessChallange$1","",1281
"cz.jaksky.chesschallenge.solver","ChessBoardSolver$","placeFigures$1","scala.collection.immutable.List,scala.collection.immutable.Set",110
"cz.jaksky.chesschallenge.solver","ChessBoardSolver$","visualizeSolution","scala.collection.immutable.Set,int,int",102
"cz.jaksky.chesschallenge.domain","Knight","check","cz.jaksky.chesschallenge.domain.Position,cz.jaksky.chesschallenge.domain.Position",81
"cz.jaksky.chesschallenge.domain","Queen","equals","java.lang.Object",73
"cz.jaksky.chesschallenge.domain","Rook","equals","java.lang.Object",73
"cz.jaksky.chesschallenge.domain","Bishop","equals","java.lang.Object",73
"cz.jaksky.chesschallenge.domain","Knight","equals","java.lang.Object",73
"cz.jaksky.chesschallenge.domain","King","equals","java.lang.Object",73
"cz.jaksky.chesschallenge.domain","Position","Position","int,int",73
"cz.jaksky.chesschallenge.domain","Position","equals","java.lang.Object",72

Conclusion

To wrap up, JITWatch is a great tool which provides insight into HotSpot JIT optimisations happening during program execution and it can help you to understand how a decision made at the source code level can affect the performance of the program. If you want to share your experience and tips please find comment section below or find me on twitter

Java performance tunning with JIT

JVM Internals

Previous article structure of JVM – java memory model briefly mentions bytecode executions modes and article JVM internal threads provides additional insight into the internal architecture of JVM execution. In this article, we focus on Just In Time compilation and on some of its basic optimisation techniques. We also discuss the performance impact of one JIT optimisation technique namely method inlining. In the remainder of this article we focus solely on HotSpot JVM, however, principles are valid in general.

HotSpot Java jvm internals

HotSpot JVM is a mixed-mode VM which means that it starts off interpreting the bytecode, but it can compile code into very highly optimised native machine code for faster execution. This optimised code runs extremely fast and performance can be compared with C/C++ code.  JIT compilation happens on method basis during runtime after the method has been run a number of times and considered as a hot method. The compilation into machine code happens on a separate JVM thread and will not interrupt the execution of the program. While the compiler thread is compiling a hot method JVM keeps on using the interpreted version of the method until the compiled version is ready.  Thanks to code runtime characteristics HotSpot JVM can make a sophisticated decision about how to optimise the code.

hotspot jit

Java HotSpot VM is capable of running in two separate modes (C1 and C2) and each mode has a different situation in which it is usually preferred:
  • C1 (-client) – used for application where quick startup and solid optimization are needed, typically GUI application are good candidates.
  • C2 (-server) – for long running server application
Those two compiler modes use different techniques for JIT compilation so it is possible to get for the same method very different machine code. Modern java application can take advantage of both compilation modes and starting from Java SE 7 feature called tiered compilation is available.

java compilethreshold

 An application starts with C2 compilation which enables fast startup and once the application is warmed up compiler C2 takes over. Since Java SE 8 tiered compilation is a default. Server optimisation is more aggressive based on assumptions which may not always hold. These optimizations are always protected with guard condition to check whether the assumption is correct. If an assumption is not valid JVM reverts the optimisation and drops back to interpreted mode. In server mode HotSpot VM runs a method in interpreted mode 10 000 times before compiling it (can be adjusted via -XX:CompileThreshold=5000). Changing this threshold should be considered thoroughly as HotSpot VM works best when it can accumulate enough statistics in order to make an intelligent decision what to compile. If you wanna inspect what is compiled using-XX:PrintCompilation.

Other JIT techniques

Among most common JIT compilation techniques used by HotSpot VM is method inlining, which is a practice of substituting the body of a method into the places where the method is called. This technique saves the cost of calling the method. In the HotSpot, there is a limit on method size which can be substituted. Next technique commonly used is monomorphic dispatch which relies on a fact that there are paths through method code which belongs to one reference type most of the time and other paths that belong to other types. So the exact method definitions are known without checking thanks to this observation and the overhead of virtual method lookup can be eliminated. JIT compiler can emit optimised machine code which is faster. There are many other optimisation techniques like loop optimisation, dead code elimination, intrinsics and others.
The performance gain by inlining optimisation can be demonstrated on a simple Scala code:
class IncWhile {

  def main(): Int = {
    var i: Int = 0
    var limit = 0

    while (limit < 1000000000) {
      i = inc(i)
      limit = limit + 1
    }
    i
  }

  def inc(i: Int): Int = i + 1
}

JIT watch

Where method inc is eligible for inlining as the method body is smaller than 35 bytes of JVM bytecode (actual size of inc method is 9 bytes). Inlining optimisation can be verified by looking into JIT optimised machine code.

IncWhile-inlined

Difference is obvious when compared to machine code when inlining is disabled use  –XX:CompileCommand=dontinline,com/jaksky/jvm/tests/jit/IncWhile.inc

IncWhile-dontinlineThe difference in runtime characteristics is also significant as the benchmark results show. With disabled inlining:

[info] Result "com.jaksky.jvm.tests.jit.IncWhile.main":
[info] 2112778741.540 ±(99.9%) 9778298.985 ns/op [Average]
[info] (min, avg, max) = (2040573480.000, 2112778741.540, 2192003946.000), stdev = 28831537.237
[info] CI (99.9%): [2103000442.555, 2122557040.525] (assumes normal distribution)
[info] # Run complete. Total time: 00:08:03
[info] Benchmark Mode Cnt Score Error Units
[info] IncWhile.main avgt 100 2112778741.540 ± 9778298.985 ns/op

When inlining enabled JVM JIT also capable to use next optimizations like loop optimizations which might case that our whole loop is eliminated as it is easily predictable. We would get time around 3 ns which are for 1GHz processor unreal to perform billions of operations. To disable most of loop optimizations use -XX:LoopOptsCount=0 JVM option.

[info] Result "com.jaksky.jvm.tests.jit.IncWhile.main":
[info] 332699064.778 ±(99.9%) 3485503.823 ns/op [Average]
[info] (min, avg, max) = (316312877.000, 332699064.778, 358738827.000), stdev = 10277087.396
[info] CI (99.9%): [329213560.955, 336184568.600] (assumes normal distribution)
[info] # Run complete. Total time: 00:04:55
[info] Benchmark Mode Cnt Score Error Units
[info] IncWhile.main avgt 100 332699064.778 ± 3485503.823 ns/op
so the performance gain by inlining a method body can be quite significant 2 seconds vs 300 milliseconds.

Conclusion

In this post, we discussed the mechanics of Java JIT compilation and some optimisation techniques used. We particularly focused on the one of the simplest optimisation technique called method inlining. We demonstrated performance gain brought by eliminating a method call represented by invokevirtual bytecode instruction. Scala also offers a special annotation @inline which should help us with performance aspects of the code under the development. All the code for running the experiments is available online on my GitHub account.

HotSpot JVM internal threads

In the Structure of Java Virtual Machine we scratched the surface of a class file structure, how it is connected to java memory model via class loading process. Also, we briefly discussed the bytecode structure and its execution including a short introduction to Just In Time runtime optimisation. In this post we will look more at the internals of execution engine, however, there is no ambition to substitute a detailed VM implementation documentation for HotSpot JVM but just provide enough details to gain bigger picture.

Hotspot java threads

Basic Threading model in HotSpot JVM is a one to one mapping between Java threads (an instance of java.lang.Thread) and native operating system threads. The native thread is created when the Java thread is started and reclaimed once it terminates. The operating system is responsible for scheduling all threads and dispatching to any available CPU. The relationship between java threads priorities and operating system thread priorities varies across operating systems.

HotSpot provides monitors by which threads running application code may participate in mutual exclusion (mutex) protocol. The monitor is either locked or unlocked. Only one thread may own the lock at any time. Only after acquiring ownership of the monitor thread may enter the critical section protected by this monitor. Critical sections are referred as synchronised blocks delineated by synchronised keyword.

JVM threads

Apart from application threads, JVM contains also internal threads which can be categorised into following groups:

  • VM Thread – responsible for executing VM operations
  • Periodic task thread – thread executing periodic operations within the VM (singleton instance of WatcherThread)
  • GC threads – threads of different types to support parallel an concurrent garbage collections
  • Compiler threads – performs a JIT compilation and optimisation of bytecode to native code at runtime (C1 and C2 JIT compilation threads)
  • Signal dispatcher threads – thread waiting for processing directed signals and dispatches them to a java signal handling method

JVM_compiler_threads

Safepoints

VM thread spends its time waiting for requested operations to appear in the operation queue (VMOperationQueue). The operation is typically passed to VM Thread because they require the VM to reach safepoint before they can be executed. When the VM is at safepoint all threads inside the VM have been blocked and any threads executing in native code are prevented from returning to the VM while the safepoint is in progress. This means that VM operation can be executed knowing that no thread can be in the middle of modifying heap. All threads are in a state such that their Java stacks are unchanging and can be examined.

Most familiar VM operation is related to garbage collection, particularly stop-the-world phase of garbage collection that is common to many garbage collocational algorithms. Other VM operation is: thread stacks dumps, thread suspension or stopping, inspection or modification via JVMTI etc. VM operation can be synchronous or asynchronous.

Safepoints are initiated using cooperative pooling based mechanism. Thread asks: “Should I block for a safepoint?” The moment when this is happening often is during thread state transition. Threads executing interpreted code don’t usually ask the question, instead of when safepoint is requested interpreter switches to different dispatch table which includes that question. When safepoint is over the dispatched table is switched back. Once safepoint has been requested VM Thread must wait until all threads are known to be in safepoint safe state before proceeding with the operation. During safepoint thread lock is used to block any threads that were running and releasing the lock when operation completed.

Posted in Uncategorized | 1 Reply

Quick overview: Structure of Java Virtual Machine

Java-based applications run in Java Runtime Environment (JRE) which consists of a set of Java APIs and Java Virtual Machine (JVM). The JVM loads an application via class loaders and runs it by the execution engine.

JVM design principles

JVM runs on all kind of hardware where executes a java bytecode without changing java execution code. VM implements a Write Once Run Everywhere principle or so-called platform independence principle. Just to sum up JVM key design principles:
  • Platform independence
    • Clearly defined primitive data types – Languages like C or C++ have a size of primitive data types depending on the platform. Java is unified in that matter.
    • Fixed byte order to Big Endian (network byte order) – Intel x86 uses little endian while RISC processors use big endian. Java uses big-endian.
  • Automatic memory management – class instances are created by the user and automatically removed by Garbage Collection.
  • Stack based VM – typical computer architectures such as Intel x86 are based on registers however JVM is based on a stack.
  • Symbolic reference – all types except primitive one are referred via symbolic name instead direct memory addresses.

Java bytecode

Java uses bytecode as an intermediate representation between source code and machine code which runs on hardware. Bytecode instruction is represented as 1 byte numbers e.g. getfield 0xb4, invokevirtual 0xb6 hence there is a maximum of 256 instructions. If the instruction doesn’t need operand so next instruction immediately follows otherwise operands follow instruction according to instruction set specification. Those instructions are contained in class files produced by java compilation. The exact structure of the class file is defined in “Java Virtual Machine specification” section 4 – class file format. After some version information there are sections like constant pools, access flags, fields info, this and super info, methods info etc. See the spec for the details.

Java class loading

A class loader loads compiled java bytecode to the Runtime Data Areas and the execution engine executes the Java bytecode. Class is loaded when is used for the first time in the JVM. Class loading works in dynamic fashion on parent-child (hierarchical) delegation principle. Class unloading is not allowed. Some time ago I wrote an article about class loading on application server. Detail mechanics of class loading is out of scope for this article.

Java memory model

Runtime data areas are used during execution of the program. Some of these areas are created when JVM starts and destroyed when the JVM exits. Other data areas are per-thread – created on thread creation and destroyed on thread exit. FThe following picture is based mainly on JVM 8 internals (doesn’t include segmented code cache and dynamic linking of language introduced by JVM 9).

25AC9487-1AB9-48DE-936C-B6A9AC781637

Program counter

Program counter exist for one thread and has the address of currently executed instruction unless it is native then the PC is undefined. PC is, in fact, pointing to at a memory address in the Method Area.

Stack

JVM stack exists for one thread and holds one Frame for each method executing on that thread. It is LIFO data structure. Each stack frame has reference to for local variable array, operand stack, runtime constant pool of a class where the code being executed.

Native Stack

Native stack is  not supported by all JVMs. If JVM is implemented using C-linkage model for JNI than stack will be C stack(order of arguments and return will be identical in the native stack typical to C program). Native methods can call back into the JVM and invoke Java methods.

Stack Frame

Stack Frame stores references that point to the objects or arrays on the heap.

    • Local variable array – all the variables used during execution of the method, all method parameters and locally defined variables.
    • Operand stack – used during execution of the bytecode instruction. Most of the bytecode is manipulating operand stack moving from local variables array.

Heap

Heap is area shared by all threads used to allocate class instances and arrays in runtime. Heap is the subject of Garbage Collection as a way of automatic memory management used by java. This space is most often mentioned in JVM performance tuning.

Non-Heap memory areas

  • Method area – shared by all threads. It stores runtime constant pool information, field and method information, static variable, method bytecode for each class loaded by the JVM. Details of this area depend on JVM implementation.
    • Runtime constant pool – this area corresponds constant pool table in the class file format. It contains all references to methods and fields. When a method or field is referred  to JVM searches the actual address of the method or field in the memory by using the constant pool
    • Method and constructor code
  • Code cache – used for compilation and storage of methods compiled to native code by JIT compilation

Java runtime

Bytecode assigned to runtime data areas in the JVM via class loader is executed by the execution engine. Engine reads bytecode in the unit of instruction. Execution engine must change the bytecode to the language that can be executed by the machine. This can happen in one of two ways:
  1. Interpreter – read, interpret and execute bytecode instructions one by one.
  2. JIT (Just In Time) compiler – compensate disadvantage of interpretation. Start executing the code in interpreted mode and JIT compiler compile the entire bytecode to native code. Execution is then switched from interpretation to execution of native code which is much faster thanks to various optimisation techniques JIT performs. Native code is stored in the cache. Compilation to native code takes time so JVM uses various metrics to decide whether to JIT compile the bytecode.

How the JVM execution engine runs is not defined by JVM specification so vendors are free to improve their JVM engines by various techniques, hotspot JVM is described in more detail and JIT watch gives insight into runtime characteristics.

More details can be found in The Java® Virtual Machine Specification – Java SE 9 Edition

Posted in Uncategorized | 1 Reply

List of useful collaboration tools for distributed teams

During past several years, working habits and working style has been rapidly changing. And this trend will continue for sure, just visit Google trends and search for “Digital nomad” or “Remote work”. However some profession undergoes this change with a better ease than others. But it is clear that companies that understand that trend benefit from that.

Working in a different style requires a brand new set of tools and approaches which provides you similar working conditions as when people are co-located at the same office. Video conferencing and phone or skype is just the beginning and doesn’t cover all aspects.

In the following paragraphs, I am going to summarize tools I found useful while working as software developer remotely in a fully distributed team. Those tools are either free or offer some free functionality and I still consider them very useful in various situations. The spectrum of the tools starts with some project management or planning tools to communicate.

Remote Communication tools

For the communication – chat and calls Slack becomes standard tool widely adopted now. It allows you to freely organize your teams, let them create channels they need. It supports a wide range of plugins e.g. chatbots and it is well integrated with others tools. Provides application on all desktop and mobile platforms.

slack

When solving some issue or just want to present something to the audience screen sharing becomes a very handy tool. Found Join.me pretty handy. Free plan with the limited size of the audience was just big enough. Working well on Mac OS and Windows, Linux platform I haven’t tried yet.

joinme

When it comes to the pure conferencing phone calls or chat Discord recently took my breath away by the awesome sound quality. Again it offers desktop and mobile clients. plus you can use just browser version if you do not wish to install anything on your PC.

discord

Planning and designing tools for remote collaboration

Now I slightly move to planning and designing tools during software development process and doesn’t matter if you use Scrum or Kanban. Those have their place there.

Remote planning tools

Shared task board with post-it notes. The one I found useful and free is Scrumblr. The only disadvantage is that it is public. It allows you to design the number of sections, change the colours of the notes and add them markers etc.

scrumblr

When we touched an agile development methodology there is no planning and estimation without planning poker. I found useful BitPoints. Simple yet meeting all our needs and free online tool where you invite all participants to the game. It allows you to do a various setting like the type of deck etc.

bitpoints

Virtual Whiteboard

When designing phase reached shared online diagramming tools we found really useful is Sketchboard. It offers a wide range of diagrams types and shapes. It offers traditional UML diagrams for sure. Free versions offer few private diagrams otherwise you go public with your design. Allows comments and team discussion.

sketchboard

Sometimes we just missed traditional whiteboard session and just brainstorm. So a web white board tool AWW meet our needs. Simple yet powerfull.

aww

Conclusion

This concludes the set of tools I found useful during a past year while working in a distributed team remotely. I hope that you found at least one useful or didn’t know it before. Do you have other tools you found useful or have better variants of those mentioned above? Please share it in the comment section!

Quick tutorial: Apache Kafka as a foundation of modern data stream platform

Working on the next project using again awesome Apache Kafka and again fighting against a fundamental misunderstanding of the philosophy of this technology which probably usually comes from previous experience using traditional messaging systems. This blog post aims to make the mindset switch as easy as possible and to understand where this technology fits in. What pitfalls to be aware off and how to avoid them. On the other hand, this article doesn’t try to cover all or goes into much detail.

How Kafka compares to traditional messaging systems

Apache Kafka is system optimized for writes – essentially to keep up with whatever speed or amount producer sends. This technology can be configured to meet any required parameters. That is one of the motivations behind naming this technology after famous writer Franz Kafka. If you want to understand the philosophy of this technology you have to take a look with a fresh eye. Forget what you know from JMS, RabbitMQ, ZeroMQ, AMQP and others. Even though the usage patterns are similar internal workings are completely different – the opposite. Following table provides a quick comparison

JMS, RabbitMQ, …
Apache Kafka
Push model
Pull model
Persistent message with TTL
Retention Policy
Guaranteed delivery
Guaranteed “Consumability”
Hard to scale
Scalable
Fault tolerance – Active – passive
Fault tolerance – ISR (In Sync Replicas)

Kafka queue

Core ideas in Apache Kafka come from RDBMS. I wouldn’t describe Kafka as a messaging system but rather as a distributed database commit log which in order to scale can be partitioned. Once the information is written to the commit log everybody interested can read it at its own pace and responsibility. It is consumers responsibility to read it not the responsibility of the system to deliver the information to the consumer. This is the fundamental twist. Information stays in the commit log for a limited time given by retention policy applied. During this period it can be consumed even multiple times by consumers. As the system has reduced set of responsibilities it is much easier to scale. It is also really fast – as sequence read from the disk is similar to random access memory read thanks to effective file system caching.

kafkaoffsets

Kafka scalability

Topic partition is a basic unit of scalability when scaling out Kafka. Message in Kafka is simple key-value pair represented as byte arrays. When message producer is sending a message to Kafka topic a client partitioner decides to which topic partition message is persisted based on message key. It is a best practice that messages that belong to the same logical group are sent to the same partition.  As that guarantee clear ordering. On the client side, exact position of the client is maintained on per topic partition bases for the assigned consumer group. So point to point communication is achieved by using exactly the same consumer group id when clients are reading from the topic partition. While publish-subscribe is achieved by using distinct consumer group id for each client to topic partition. The offset is maintained for consumer group id and topic partition and can be reset if needed.

kafkacommunication

Topic partitions can be replicated zero or n times and distributed across the Kafka cluster. Each topic partition has one leader and zero or n followers depends on replication factor. The leader maintains so-called In Sync Replicas (ISR) defined by delay behind the partition leader is lower than replica.lag.max.ms. Apache Zookeeper is used for keeping metadata and offsets.

kafkacluster

Kafka defines fault tolerance in following terms:
  • acknowledge – broker acknowledge to producer message write
  • commit – the message is written to all ISR and consumer can read
While producer sends messages to Kafka it can require different levels of consistency:
  • 0 – producer doesn’t wait for confirmation
  • 1 – wait for acknowledge from the leader
  • ALL – wait for acknowledge from all ISR ~ message commit

Apache Kafka configuration options

Apache Kafka is quite flexible in configuration and as such, it can meet many different requirements in terms of throughput, consistency and scalability. Replication of topic partition brings read scalability on the consumer side but also poses some risk as it is some additional level of complexity to achieve this. If you are unaware of those corner cases it might lead to nasty surprises, especially for newcomers. So let’s take a closer look at following scenario.

Loosing messages scenario

We have topic partition with a replication factor 2. Producer requires highest consistency level, set to ack = all. Replica 1 is currently the leader. Message 10 is committed hence available to clients. Message 11 is not acknowledged nor committed due to the failure of replica 3. Replica 3 will be eliminated from ISR or put offline. That causes that message 11 becomes acknowledged and committed.

kafka_uc1

Next time we lose Replica 2 it is eliminated from ISR and the same situation repeats for messages 12 and 13.
kafka_uc2.png
The situation can still be a lot worse if cluster loses current partition leader – Replica 1 is down now.
kafka_uc3
What happens if Replica 2 or Replica 3 goes back online before Replica 1? One of those becomes a new partition leader and we lost data messages 12 and 13 for sure!
kafka_uc4

Is that a problem? Well, the correct answer is: It depends. There are scenarios where this behaviour is perfectly fine. Imagine collecting logs from all machines via sending them through Kafka. On the other hand, if we implement event sourcing and we just lost some events that we cannot recreate the application state correctly. Yes, we have a problem! Unfortunately, if that doesn’t change in latest releases, that is default configuration if you just install new fresh Kafka cluster. It is a set up which favour availability and throughput over other factors. But Kafka allows you to set it up in a way that it meets your requirements for consistency as well but will sacrifice some availability in order to achieve that (CAP theorem). To avoid the described scenario you should use the following configuration. The producer should require acknowledging level ALL. Do not allow kafka perform a new leader election for dirty replicas – use settings unclean.leader.election.enable = false. Use replication factor (default.replication.factor = 3) and require minimal number of replicas to be in sync state to higher than 1 (min.insync.replicas = 2).

Message delivery quarantees

We already quickly touched the topic of message delivery to the consumer. Kafka doesn’t guarantee that message was delivered to all consumers. It is the responsibility of the consumers to read messages. So there is no semantics of persistent message as known from traditional messaging brokers. All messages sent to Kafka are persistent meaning available for consumption by clients according to the retention policy. Retention policy essentially specifies how long the message will be available in Kafka. Currently, there are two basic concepts – limited by space used for keeping messages or time for which the message should be at least available. The one which gets violated first wins.

Data cleanup

When I need to clean the data from the Kafka (triggered by retention policy) there are two options. The simplest one just deletes the message. Or I can compact messages. Compaction is a process where for each message key is just one message, usually the latest one. That is actually the second semantics of key used in the message.

Kafka “missing” features

What features you cannot find in Apache Kafka compared to traditional messaging technologies? Probably the most significant is an absence of any selector in combination with listening (wake me on receive). For sure can be implemented via correlation id, but efficiency is on the completely different level. You have to read all messages, deserialize those and filter. Compared to a traditional selector which uses the custom field in message header where you don’t need even to deserialize message payload that is on the completely different level. Monitoring Kafka on production environment essentially concerns elementary question: Are the consumers fast enough? Hence monitoring consumers offsets with respect to the retention policy.

Kafka was created on LinkedIn to solve a specific problem of modern data-driven application to fill the gap in traditional ETL processes usually working with flat files and DB dumps. It is essentially enterprise service bus for data where software components need exchange data heavily. It unifies and decouples data exchange among components. Typical uses are in “BigData” pipeline together with Hadoop and Spark in lambda or kappa architecture.  It lays down foundations of modern data stream processing.

Conclusion

This post just scratches basic concepts in Apache Kafka. If you are interested in details I really suggest to read following sources which I found quite useful on my way when learning Kafka:

Hadoop IO and file formats

In this post dedicated to Big Data I would like to summarize hadoop file formats and provide some brief introduction to this topic. As things are constantly evolving especially in the big data area I will be glad for comments in case I missed something important. Big Data framework changes but InputFormat and OutputFormat stay the same. Doesn’t matter what’s big data technology is in use, can be hadoop, spark or …

File formats basic concepts

Let’s start with some basic terminology and general principles. The key term in mapreduce paradigm is split which defines a chunk of the data processed by single map. Split is further divided into the record where every record is represented as a key-value pair. That is what you actually know from mapper API as your input. The number of splits gives you essentially the number of map tasks necessary to process the data which is not in clash with the number of defined mappers for your mapreduce slots. This just means that some map tasks need to wait until the map slot is available for processing. This abstraction is hidden in IO layer particularly InputFormat or OutputFormat class which contains RecordReader, RecordWriter class responsible for further division into records. Hadoop comes with a bunch of pre-defined file formats classes e.g. TextInputFormat, DBInputFormat, CombinedInputFormat and many others. Needless to say that there is nothing which prevents you from coming with your custom file formats.

Described abstraction model is closely related to mapreduce paradigm but what is the relation to underlying storage like HDFS? First of all, mapreduce and distributed file system (DFS) are two core hadoop concepts  which are “independent” and the relation is defined just through the API between those components. The well-known DFS implementation is HDFS but there are several other possibilities(s3, azure blob, …). DFS is constructed for large datasets. The core concept in DFS is a block which represents a basic unit of the original dataset for a manipulation and processing e.g. replication etc. This fact puts also additional requirements on dataset file format: it has to be splittable – that means that you can process a given block independently from the rest of the dataset. If the file format is not splittable and you would run a mapreduce job you wouldn’t get any level of parallelism and the dataset would be processed by a single mapper. Splittability requirement also applies if the compression is desired as well.

What is the relation between a block from DFS and split from mapreduce? Both of them are essentially key abstractions for parallelization but just in different frameworks and in ideal case they are aligned. If they are perfectly aligned that hadoop can take full advantage of so-called data locality feature which runs the map or reduce tasks on a cluster node where the data resides and minimize the additional network traffic. In case of imprecise alignment, a remote reads will happen for records missing for a given split. For that reasons file formats includes sync markers or points.

To take an advantage and full power of hadoop you design your system for big files. Typically the DFS block size is 64MB but can be bigger. That means that biggest Hadoop enemy is a small file. The number of files which lives in DFS is somehow limited by the size of Name Node memory. All the datasets metadata are kept in memory. Hadoop offers several strategies how to avoid of this bad scenario. Let’s go through those file formats.

Hadoop HDFS data file formats

Hadoop archive (HAR)

HAR file (stands for Hadoop archive) – is a specific file format which essentially packs a bunch of files into a single logical unit which is kept on name node. HAR files don’t support additional compression and as far as I know are transparent to mapreduce. Can help if name nodes are running out of memory.

Sequence file

Sequence file is a kind of file-based data structure. This file format is splittable as it contains a sync point after several records. The record consists of key – value and metadata. Where key and value is serialized via class whose name is kept in the metadata. Classes used for serialization needs to be on CLASSPATH.

MAp file

Map file is again a kind of hadoop file based data structure and it differs from a sequence file in a matter of the order. Map file is sorted and you can perform a look up. Behavior pretty similar to java.util.Map class.

AVRO data file

Avro data file is based on avro serialization framework which was primarily created for Hadoop. It is a splittable file format with a metadata section at the beginning and then a sequence of Avro serialized objects. Metadata section contains a schema for an Avro serialization. This format allows a comparison of data without deserialization.

Google Protocol buffers

Google Protocol buffers are not natively supported by Hadoop but you can plug the support via libraries as elephant-bird from twitter.

Text files

So what about file formats as XML and JSON? They are not natively splittable and so “hard” to deal.  A common practice is to store then into text file a single message per line.

For textual files needless to say that those files are the first class citizens in Hadoop. TextInputFormat and TextOutputFormat deal with those. Byte offset is used as key and the value is the line content.

Conclusion

This blog post just scratches the surface of Hadoop file formats but I hope that it provides a good introduction and explain the connection between two essential concepts – mapreduce and DFS. For the further reference book, Hadoop Definite guide goes into the great detail.

Posted in Uncategorized | 1 Reply

Pack java application as a RPM linux service package

RPM vs jar

Java applications archives as jar, war and ear files are elementary distribution blocks in the java world. At the beginning managing all of these libraries and components were a bit cumbersome and error prone as the project dependencies depends on another libraries and all those transitive dependencies creates so called dependency hell. In order to ease developers of this burden Apache Maven (maven like tools) were developed. Every artefact has so called coordinates which uniquely identifies it and all dependencies are driven by those coordinates in a recursive fashion.

Maven ease the management at the stage of the artefact development but doesn’t help that much when we want to deploy the application component. Many times that’s not such a big deal if your run time environment is clustered J2EE aplication server e.g. Weblogic cluster. You hand the ear or war over to your ops team and they deploy it to the cluster via cluster management console to all nodes at once. They need to maintain an archive of deployed components in case of roll back etc. This is the simplest case (isolated component and doesn’t solve dependencies e.g. libraries provided in the cluster etc.) where management is relatively clean but relying on the process a lot. When we consider different run time environment like run the application as a server less java process (opposed to J2EE cluster) then the stuff gets a bit more complicated even for a simplest case. Your java applications are typically distributed as a jar file and you need to distribute it to every single linux server where instance of this process is running. Apart of that standard jar file doesn’t contain dependencies. One possible solution to that would be to create shaded (fat) jar file which has all dependencies embedded. I suppose that you have a repository where all builds are archived. Does it make sense to store those big archives where the major part are 3rd party libraries? This is probably not the right way to go.

Another aspect of roll out process is ability to automate it. In case of J2EE clusters like weblogic there is often scripting tool provided (WLST ~ weblogic scripting tool). The land of pure jar is again a lot worse. You can take some advantage of maven but that doesn’t solve all the problems. Majority of production environments in java world run on linux operating system so why not to try to take advantage of linux server standard distribution management like yum, apt etc. for distributing rpm linux packages. This system provides atomicity, dependency management between rpm linux packages, easy way to roll back (keeps track of versions), minimise the number of manual steps – potential of human error is reduced and involves native auditing. It is pretty easy to get an info about installation history.

Pack java application to RPM

rpmbuild tool introduction

To pack your java jar file application you need a tool called rpmbuild which creates a linux package from a SPEC file. SPEC file is something like pom in maven world plus it contains instruction how to install, uninstall etc. Packages containing a required plus handy tools are rpmdevtool and rpmlint. On linux OS it is simple to install it. On Windows OS you need a cygwin installed with the same tool set. In order to build your rpm work space run the following command. It is highly recommended not to run it under root account if there is no special need for it.

rpmdev-setuptree

This command creates rpmbuild folder – that is the place where all linux RPM packaging will happen. It contains sub-folders: BUILD, RPMS, SOURCES, SPECS, SRPMS. For us the important ones are RPMS – will contain final linux rpm and SPECS – this is the place we need to put our SPEC file describing installation and content of our application.

Create spec file

This file is the core of the linux rpm packaging. It contains all the information about version, dependencies, installation, un-installation, upgrade etc. We can create our skeleton SPEC file by running following command:

rpmdev-newspec

Majority of directives in this file are clear from its name, e.g. Name, Version, Summary, BuildArch etc. BuildRoot require special attention. It is a sort of proxy which mimics a root of system under the construction e.g. If I want to install my [application_name] (replace this place holder with actual name) to /usr/local/[application_name] location I have to create this structure under BuildRoot during the installation. Then there are important sections which corresponds to various phases of installation: %prep, %build, %install – which is the most important for as as we do not build from sources but just pack already built jar file to linux rpm package. Last very important section of this file is %files which lists all files which will be in the final linux rpm package and hence installed in the target machine. Apart from that there can be additional hooks to installation and un-installation process as %post, %preun, %postun etc. which allows you to customize a process as you need. Sample SPEC file follows:

%define _tmppath /home/virtual/rpmbuild/tmp
Name: [application_name]
Version: 1.0.2
Release: 1%{?dist}
Summary: Processor component which feed data into DB
Group: Applications/System
License: GPL
URL: https://jaksky.wordpress.com/
BuildRoot: %{_topdir}/%{name}-%{version}-%{release}-root
BuildArch: noarch
Requires: jdk >= 7
%description
Component which process incoming messages and store them to DB.

%prep

%build

%install
rm -rf $RPM_BUILD_ROOT
mkdir -p $RPM_BUILD_ROOT/usr/local
cp -r %{_tmppath}/[application_name] $RPM_BUILD_ROOT/usr/local
mkdir -p $RPM_BUILD_ROOT/usr/local/[application_name]/logs
mkdir -p $RPM_BUILD_ROOT/etc/init.d
cp -r %{_tmppath}/[application_name]/bin/[application_name] $RPM_BUILD_ROOT/etc/init.d
mkdir -p $RPM_BUILD_ROOT/var/run/[java application]

%files
%defattr(644,[application_name],[application_name])
%dir %attr(755, [application_name],[application_name])/usr/local/[application_name]
%dir %attr(755,[application_name],[application_name]) /usr/local/[application_name]/lib
/usr/local/[application_name]/lib/*
%attr(755,[application_name],[application_name]) /usr/local/[application_name]/logs
%dir %attr(755,[[application_name],[application_name]) /usr/local/[application_name]/conf
%config /usr/local/[application_name]/conf/[application_name]-config.xml
%config /usr/local/[application_name]/conf/log4j.properties
%dir %attr(755,[application_name],[application_name]) /usr/local/[application_name]/deploy
/usr/local/[application_name]/deploy/*
%doc /usr/local/[application_name]/README.txt
%dir %attr(755,[application_name],[application_name]) /usr/local/[application_name]/bin
%attr(755,[application_name],[application_name]) /usr/local/[application_name]/bin/*
%attr(755,root,root) /etc/init.d/[application_name]
%dir %attr(755,[application_name],[application_name]) /var/run/[application_name]

%changelog
* Wed Nov 13 2013 Jakub Stransky <Jakub.Stransky@jaksky.com> 1.0.2-1
- Bug Fixing wrong messages format
* Wed Nov 13 2013 Jakub Stransky <Jakub.Stransky@jaksky.com> 1.0.1-1
- Bug Fixing wrong messages format
* Mon Nov 11 2013 Jakub Stransky <Jakub.Stransky@jaksky.com> 1.0.0-1
- First relaese of [application_name]

Several things to highlight in the SPEC file example: tmppath points to the location where the installed application is prepared, that is essentially what is going to be packed to rpm package. %defattr set the standard attributes to files if special one are not specified. %config denotes configuration files which means that for the first installation those standard one are provided but in case of upgrade those file will not be overwritten as they are probably customized to this particular instance.

Create PRM package

Now we are ready to create the linux rpm package just the last step is pending:

rpmbuild -v -bb --clean SPECS/nameOfTheSpecFile.spec

TEst RPM package

Created package can be found in RPMS subfolder. We can test the package locally by

rpm -i nameOfTheRpmPackage.rpm

To complete the smoke test lets remove the package by

rpm -e nameOfTheApplication

Creating a SPEC file should be pretty straightforward process and once you create your SPEC file for the application building of linux rpm package is one minute job. But if you want to automate it there is a maven plugin which generates a SPEC file for you. It is essentially wrapper of rpmbuild utility which means that plugin works fine on linux with tool set installed but on windows machine you need have cygwin installed and create wrapper bat file to mimic rpmbuild utility for the plugin. Detailed manual can be found for example here.

Couple things to highlight when creating a SPEC file. Prepare the linux package for all scenarios – install, remove, upgrade and configuration management right from the beginning. Test it properly. It can save you a lot of troubles and manual work in case of large installations. Creating a new version of java application is only about about replacing jar file, re-packaging rpm bundle.

Conclusion

In this quick walk through I tried to show that creating of linux rpm package as a unit for software deployment of the java application is not that difficult and can neaten a roll out process. I just scratch the surface of linux rpm packaging and I was far away from showing all capabilities of this approach. I will conclude this post by several links which I found really useful.

If you have some tips or wan’t share your experience please find the comment section bellow or reach me on twitter

References

Great tutorial on RPM packaging in general
Good rpmbuld manual pages
Maven rpm plugin
Maximum RPM book

Overview of Hadoop High Availability strategies

Desire for high availability

Scalability, Availability, Resilience – those are just common examples of computer system requirements which forms an overall application architecture very strongly and have a direct impact to “indicators” such as Customer Satisfaction Ratio, Revenue, Cost, etc. The weakest part of the system has the major impact on those parameters. The topic of this post availability is defined as the percentage of time that a system is capable of serving its intended function.

In BigData era Apache Hadoop is a common component of nearly every solution. As the system requirements are shifting from purely batch-oriented systems to near-to-real-time systems this just adds pressure on systems availability. Clearly, if the system in batch mode runs every midnight than 2 hours downtime is not such a big deal as opposed to near-to-real-time systems where result delayed by 10 min is pointless.

I this post I will try to summarize Hadoop high availability strategies as a complete and ready to use solutions I encountered during my research on this topic.

Hadoop 1.x

In Hadoop 1.x the well-known fact is that the Name Node is a single point of failure and as such all high availability strategies try to cope with that – strengthen the weakest part of the system. Just to clarify widely spread myth – Secondary Name Node isn’t a backup or recovery node by nature. It has different tasks than Name Node BUT with some changes, Secondary Name Node can be started in the role of Name Node. But neither this doesn’t work automatically nor that wasn’t the original role for SNN.

High Availablity strategies

High availability strategies can be categorized by the state of standby: Hot/Warm Standby or Cold Standby. This has a direct correlation to failover(start up) time. To give a raw idea(according to doc): Cluster with 1500 nodes with PB capacity – the startup time is close to one hour. Startup consists of two major phases: restoring the metadata and then every node in HDFS cluster need to report block location.

Hadoop 1.x HA strategies

The typical solution for Hadoop 1.x which makes use of NFS and logical group of name nodes. Some resources claim that in case of NFS unavailability the name node process aborts what would effectively stop the cluster. I couldn’t verify that fact in different sources of information but I feel important to mention that. Writing name node metadata to NFS need to be exclusive to a single machine in order to keep metadata consistent. To prevent collisions and possible data corruption a fencing method needs to be defined. Fencing method assures that if the name node isn’t responsive that he is really down. In order to have a real confidence, a sequence of fencing strategies can be defined and they are executed in order. Strategies range from simple ssh call to power supply controlled over the network. This concept is sometimes called shot me in the head. The failover is usually manual but can be automated as well. This strategy works as a cold standby and Hadoop providers typically provide this solution in their High Availability Kits.

Because of the relatively long, start up time of back up name node some companies (e.g. Facebook) developed their own solutions which provide hot or warm standby. Facebook’s solution to this problem is called avatar node. The idea behind is relatively simple: Every node is wrapped to so-called avatar(no change to original code base needed!). Primary avatar name node writes to shared NFS filer. Standby avatar node consists of secondary name node and back up name node. This node continuously reads HDFS transaction logs and keeps feeding those transactions to encapsulated name node which is kept in safe mode which prevents him from performing any active duties. This way all name node metadata are kept hot. Avatar in standby mode performs duties of secondary name node. Data nodes are wrapped to avatar data nodes which send block reports to both primary and standby avatar node. Failover time is about a minute. More information can be found here.

Another attempt to create a Hadoop 1.x hot standby coming to form China Mobile Research Institute is based on running synchronization agents and sync master. This solution brings another question and it seems to me that it isn’t so mature and clear as the previous one. Details can be found here.

Hadoop 2.x HA strategies

An ultimate solution to high availability brings Hadoop 2.x which removes a single point of failure from a different architecture. YARN (Yet Another Resource Negotiator) also called MapReduce 2. And for HDFS there is another concept called Quorum Journal Manager (QJM) which can use NFS or Zookeeper as synchronization and coordination framework. Those architectural changes provide the option of running two redundant NameNodes in the same cluster in an Active/Passive configuration with a hot standby.

Conclusion

This post just scratches the surface of Hadoop High Availability and doesn’t go deep in detail daemon but I hope that it is a good starting point. If someone from the readers is aware of some other possibility I am looking forward to seeing that in the comment section.

How to deploy Java application as a Linux service

Linux service vs J2EE container

Using standard J2EE containers for application deployment is not always suitable option. Time to time you need to run an java application (jar file) as a server less, more light weight linux process. Using standard java -cp …. MainClass is feasible but sooner or latter you will reveal that there is something important missing. Especially if you are supposed to run multiple components in this way. I becomes relly messy and hard to manage pretty soon. On linux system there is a solution which is a lot better – run the component as a linux service.

Linux service controlling process

Lets make is simple and easy to understand. Linux service is essentially a “process” which is driven by init script and has defined API – set of standard commands for management of the underlying linux process. Those linux service commands looks as following(processor represents actual name as defined in init script, see latter):

service processor start
service processor status
service processor stop
service processor restart

That’s a lot simpler, easy to manage and monitor, right? You don’t need to know where particular jar file is located etc. Examples of init scripts can be usually located /etc/init.d/samples or just simply read scripts in /etc/init.d which contains various init scripts for different kinds of linux services already present on the system.

Linux Service wrappers

For java applications there is a bunch of projects which acts as a service wrappers. That enables you to quickly and easily turn jar file to regular linux service as a program daemon. There are wrappers even for windows OS. For some reasons I was directed to use just linux server standard tools so the reminder of this post will be about making the linux service program daemon in a common way via shell scripts.

Startup and shutdown scripts

First of all there is a necessity to create startup and shutdown script with a need to properly manage pid (process id) file accordingly. A good practice is to have a dedicated user to run a particular linux services and have them installed under /usr/local/xxx .
startup script follows:

#!/bin/sh
#
# Script parameters: [Instalation_Foleder]
#
# JAVA_HOME Must point at your Java Development Kit installation.
# Required to run the with the "debug" argument.
#
# JRE_HOME Must point at your Java Runtime installation.
# Defaults to JAVA_HOME if empty. If JRE_HOME and JAVA_HOME
# are both set, JRE_HOME is used.
#
# JAVA_OPTS (Optional) Java runtime options used when any command
# is executed.

# Check the way the script has been called and set current directory as PROCESSOR_HOME
if [ "X$1" = "X" ]
then
  cd .. >/dev/null
  pwd >/dev/null
  PROCESSOR_HOME=$PWD
  SERVICE_INVOKE="no"
else
  PROCESSOR_HOME=$1
  SERVICE_INVOKE="yes"
fi
echo PROCESSOR_HOME set to $PROCESSOR_HOME
# Load confing
source $PROCESSOR_HOME/bin/config.sh
# Check if the invocation is according to configuration [asService | asProcess]
if [ ! "$SERVICE_INVOKE" == "$RUN_AS_SERVICE" ]
then
  echo "ERROR - Invocation is not according to configuration - run as a Lunux Service= $RUN_AS_SERVICE"
  exit 6
fi
# check installation
if [ ! -d "$PROCESSOR_HOME/bin" \
-o ! -f "$PROCESSOR_HOME/bin/config.sh" \
-o ! -d "$PROCESSOR_HOME/conf" \
-o ! -d "$PROCESSOR_HOME/deploy" \
-o ! -d "$PROCESSOR_HOME/lib" \
-o ! -f "$PROCESSOR_HOME/conf/log4j.properties" \
-o ! -f "$PROCESSOR_HOME/deploy/test1-1.0-SNAPSHOT.jar" ];
then
echo
echo ERROR - Installation is not correct!
echo Expected installation package looks:
echo "$PROCESSOR_HOME/bin"
echo "$PROCESSOR_HOME/bin/config.sh"
echo "$PROCESSOR_HOME/conf"
echo "$PROCESSOR_HOME/conf/log4j.properties"
echo "$PROCESSOR_HOME/deploy"
echo "$PROCESSOR_HOME/deploy/test1-1.0-SNAPSHOT.jar"
echo "$PROCESSOR_HOME/lib"
exit 1
fi
# clean up
CLASSPATH=
JAVA_OPTS=
JAVA_PATH=
JAVA_EXEC=

# set JAVA
REQUIRED_JVM_VERSION=1.7
if [ -z "$JAVA_HOME" ];
then
  if [ -z "$JRE_HOME" ];
    then
      echo ERROR - either JAVA_HOME or JRE_HOME is not set!!!
      exit 1
    else
    echo Java JRE used $JRE_HOME
    JAVA_PATH=$JRE_HOME
  fi
else
  echo Java used $JAVA_HOME
  JAVA_PATH=$JAVA_HOME
fi

# set JAVA_EXEC
JAVA_EXEC=$JAVA_PATH/bin/java
#check Java bin
if [ ! -x "$JAVA_EXEC" ];
then
  echo Java binaries not found $JAVA_EXEC
  exit 1
fi
# checkJavaVersion
JVM_VERSION=$("$JAVA_EXEC" -version 2>&1 | awk -F '"' '/version/ {print $2}')
#echo version "$JVM_VERSION"
if [[ "$JVM_VERSION" < "$REQUIRED_JVM_VERSION" ]];
then
  echo ERROR - $JAVA_EXEC doesnt point to propper java version $REQUIRED_JVM_VERSION
  exit 1
fi
# setBDHISTP_MAIN
BDHISTP_MAIN=cz.jaksky.PROCESSOR.PROCESSOR
# setClasspath
CLASSPATH=$PROCESSOR_HOME/deploy/*:$PROCESSOR_HOME/lib/*
# echo Classpath set to: $CLASSPATH

# setJAVA_OPTS
JAVA_OPTS=-Dbdconf=$PROCESSOR_HOME/conf
JAVA_OPTS="$JAVA_OPTS -Dlog4j.configuration=file:$PROCESSOR_HOME/conf/log4j.properties"
#echo JAVA_OPTS set to: $JAVA_OPTS
# This is nasty as in the code there is hardcoded location to actual config file for the process
cd $PROCESSOR_HOME
runProgram() {
echo $JAVA_EXEC $JAVA_OPTS -classpath $CLASSPATH $BDHISTP_MAIN
$JAVA_EXEC $JAVA_OPTS -classpath $CLASSPATH $BDHISTP_MAIN & PROCESS_PID=$!
echo $PROCESS_PID > $PIDDIR/$PID_FILENAME
echo "new application instance started as process $PROCESS_PID"
}

if [ ! -f "$PIDDIR/$PID_FILENAME" ]
then
  echo "I will try to start new process ..."
  runProgram
else
  PID=$(cat $PIDDIR/$PID_FILENAME)
  if ps -p $PID >/dev/null
    then
      echo "WARNING $APP_NAME already running as process $PID"
    else
      echo "process $PID is not running - will try to start a new instance of the application"
      echo " "
      runProgram
  fi
fi
exit 0

shutdown script follows:

#!/bin/sh
# Script usage:
# this script can be invoked either directly in bin folder or from different location with passing information where to locate installation folder
#
# Check the way the script has been called and set current directory as PROCESSOR_HOME
if [ "X$1" = "X" ]
then
  cd .. >/dev/null
  pwd >/dev/null
  PROCESSOR_HOME=$PWD
  SERVICE_INVOKE="no"
else
  PROCESSOR_HOME=$1
  SERVICE_INVOKE="yes"
fi
echo PROCESSOR_HOME set to $PROCESSOR_HOME
# Load confing
source $PROCESSOR_HOME/bin/config.sh
if [ -z "$PIDDIR" ]
then
  echo "ERROR - Installation configuration file config.sh not found at $PROCESSOR_HOME/bin"
  exit 1
fi
# Load confing
source $PROCESSOR_HOME/bin/config.sh
# Check if the invocation is according to configuration [asService | asProcess]
if [ ! "$SERVICE_INVOKE" == "$RUN_AS_SERVICE" ]
then
  echo "ERROR - Invocation is not according to configuration - run as a Lunux Service= $RUN_AS_SERVICE"
  exit 6
fi
if [ -f "$PIDDIR/$PID_FILENAME" ]
then
  PID=$(cat $PIDDIR/$PID_FILENAME)
  kill $PID
  RC=$?
  rm $PIDDIR/$PID_FILENAME
  echo "Application $APP_NAME - process $PID shut down successfull"
  exit $RC
else
  echo "pid file not exist $PIDDIR/$PID_FILENAME, nothing to shut down"
  exit 0
fi

Config script

Those scripts relies on existence of installation configuration shell script – config.sh located in bin folder of installation as follows:

#!/bin/sh
RUN_AS_SERVICE="yes"
APP_NAME="Processor"
APP_LONG_NAME="Processor instance"
PIDDIR="/var/run/processor"
PID_FILENAME="processor.pid"

Startup script creates pid file located /var/run/processor – user under which the installation is running needs to have appropriate privileges.

Init.d script

Finally the init script which needs to be placed into /etc/init.d folder:

 ### BEGIN INIT INFO
# Provides: processor
# Required-Start:
# Required-Stop:
# Default-Start: 2 3 4 5
# Default-Stop: 0 1 6
# Short-Description: processor daemon
# Description: processor daemon
# This provides example about how to
# write a Init script.
### END INIT INFO
# Config to edit if needed
INSTALL_HOME=/usr/local/Processor
JAVA_HOME=/usr/java/default
SERVICE_USER="processor"
# No modification allowed from here
# Using the lsb functions to perform the operations.
. /lib/lsb/init-functions
#
# If the daemon is not there, then exit.
test -x $INSTALL_HOME/bin/startUp.sh || exit 5
test -x $INSTALL_HOME/bin/shutDown.sh || exit 5
test -x $INSTALL_HOME/bin/config.sh || exit 5
# Load confing
source $INSTALL_HOME/bin/config.sh
export JAVA_HOME
PIDFILE=$PIDDIR/$PID_FILENAME
# Process name ( For display )
NAME=$APP_NAME
CURRENT_USER=`id -nu`
start(){
  echo "Starting $NAME under $SERVICE_USER user..."
  if [ "$CURRENT_USER" == "$SERVICE_USER" ]
  then
    $INSTALL_HOME/bin/startUp.sh $INSTALL_HOME >/dev/null
    RC=$?
  else
    su --preserve-environment --command="$INSTALL_HOME/bin/startUp.sh $INSTALL_HOME >/dev/null" $SERVICE_USER
    RC=$?
  fi
}
stop(){
  echo "Stoping $NAME running under $SERVICE_USER user ..."
  if [ "$CURRENT_USER" == "$SERVICE_USER" ]
  then
    $INSTALL_HOME/bin/shutDown.sh $INSTALL_HOME >/dev/null
    RC=$?
  else
    su --preserve-environment --command="$INSTALL_HOME/bin/shutDown.sh $INSTALL_HOME >/dev/null" $SERVICE_USER
    RC=$?
  fi
}
case $1 in
start)
  start
  exit $RC
;;
stop)
  stop
  exit $RC
;;
restart)
  stop
  start
  exit $RC
;;
status)
  if [ ! -f "$PIDDIR/$PID_FILENAME" ]
  then
    echo "$NAME is NOT RUNNING"
    exit 1
  else
    PID=$(cat $PIDDIR/$PID_FILENAME)
    if ps -p $PID >/dev/null
    then
      echo "$NAME is RUNNING $PID"
      exit 0
    else
      echo "$NAME is NOT RUNNING"
      exit 1
    fi
  fi
;;
*)
# For invalid arguments, print the usage message.
echo "Usage: $0 {start|stop|restart|status}"
exit 2
;;
esac

In the init script there is a need to change to appropriate java apps installation folder JAVA_HOME if not default and SERVICE_USER to user which is supposed to run this service. Service can be started under root account or SERVICE_USER without password specification or any other user with knowledge of credentials.

Conclusion

If you have a production like experience with java service wrappers mentioned at the beginning of the article don’t hesitate and share it! This way it serves the purpose at given situation.

How to search fully qualified java class name for jar file

I am pretty sure that every java developer were in the situation when he was searching for a java archive file having fully qualified class name.

Java fully qualified class name

Fully qualified name is enough info to get this kind of issue resolved. You can either take advantage of sites like http://www.findjar.com/ or features of IDE – search for class. Those approaches works well when missing class is from open source or at least from publicly available jar libraries. If the jar is already in your project but just missing item on the classpath – then the second case is applicable. But then there is vast amount of cases when you are searching for a library from vendor specific product which consists of huge amount of jar files. One way to find a class is to import all those libs to the IDE and then look up for a required class. This approach is a bit awkward. More straightforward approach is to search through product’s filesystem directly. One handy bash script follows – in this case searching for com.oracle.pitchfork.interfaces:

for i in 'find ./  -name "*.jar"'
do
result='$JAVA_HOME/bin/jar -tvf $i'
echo $result | grep -i com.oracle.pitchfork.interfaces >dev/null
if[$? == 0]; then
echo $i;
fi
done

Run this bash from the product’s root folder – all jars containing required class will be listed.

Weblogic classloading

java.lang.NoSuchMethodError sucks

Getting a java.lang.NoSuchMethodError is usually the beginning of great exploration of your platform – in this case weblogic. Javadoc says:

Thrown if an application tries to call a specified method of a class (either static or instance), and that class no longer has a definition of that method.
Normally, this error is caught by the compiler; this error can only occur at run time if the definition of a class has incompatibly changed
.

java Classloader might be the culprit

What’s the hack going on here! Libraries used are embedded into the final archive I did verified that! If you don’t know simply suspect classloaders, publicly known enemies of java developers 🙂 As rule no.1 which says: “Verify your assumptions”. The fact that the class is in archive doesn’t necessary mean that it gets loaded, so to verify that simply pass -verbose or -verbose:class argument to weblogic’s JVM in startUp.sh/bin and you will get the origin of loaded classes.

Class loaded from WL_HOME/modules, how’s that possible? To understand that general understanding of classloading is essential and then understand your J2EE standard implementation e.g. Weblogic, JBoss, … This post is not going to pretend an expert detail knowledge level on this topic so I will rather stay with general principles with reference to details documentation.

J2EE Application server class loaders hierarchy

Java has several class loaders (bootstrap, extension, …) the important fact is that they work in some hierarchy (parent-child relationship) with some delegation scheme which says when to load a class and from where. Java elementary delegation principle says: Delegate finding classes and resources to their parent before searching own classpath. Only if the parent cannot find it child is allowed to load it. So far so good. To complicate the matter a bit more – java servlet specification recommends look at child classloader before delegating to parent (if this recommendation were taken you need to check with documentation of J2EE implementation you are using, as you can see you know nothing based on those rules 🙂 ) So in my case of Weblogic J2EE implementation

as you can see system classloader is the parent of all the application’s classloaders, details can be found here. So how the class get loaded from WL_HOME/modules ? The framework library must be on system classpath. On the system classpath is just weblogic.jar not my framework library?

Weblogic class loader magic

Weblogic 10 in order to better modularity included components under WL_HOME/modules and weblogic.jar now refers to these components in the modules directory from its manifest classpath. So that means that other version of library sits on system classloader – the parent of all the application classloaders, so that means that those libraries included in application archives will be ignores based on the delegation scheme. (That was probably the idea why was recommended in J2EE classloading delegation scheme – child first). However weblogic does offer other way how to solve this case by so called classloader filters/interceptors defined in weblogic specific deployment descriptor either on ear level or war level.
weblogic-application.xml

org.apache.log4j.*
antlr.*

weblogic.xml

      true

Posted in Uncategorized | 1 Reply

Java class version

Time to time it might happen that you need to know which version the class files were compiled for. Or to be more specific what target were specified while running javac compiler. As target specifies VM version the classes were generated for. This can be specified in maven as follows:

<plugin>
<artifactId>maven-compiler-plugin</artifactId>
<configuration>
<target>1.6</target>
</configuration>
</plugin>

It is not a rocket science, right. To find out the version the code were generated for we use javap (java class file disassembler). The following line do the trick:

javap -verbose -classpath versiontest-1.0.jar cz.test.string.StringPlaying

Compiled from "StringPlaying.java"
public class cz.test.string.StringPlaying extends java.lang.Object
SourceFile: "StringPlaying.java"
minor version: 0
major version: 50
Constant pool:
const #1 = Method       #12.#28;        //  java/lang/Object."<init>":()V
const #2 = String       #29;            //  beekeeper
const #3 = Method       #30.#31;        //  java/lang/String.substring:(II)Ljava/lang/String;

Major version matches java version based on following table


Table taken from Oracle blog

Step by step guide how to setup a Build Number with TeamCity CI server

SDLC tracebility is the king

One of the most important thing during the SDLC (for sure apart from the other stuff) is to keep control over deployed artifacts to all environments at any given time. Lack of control leads to chaos and generates a lot of extra work to the team, degrades throughput, morale and motivation. No need to even mention that arguments among team members regarding deployed features or fixes definitely do not contribute well to the team spirit.

Trace build artefacts

One of the common approaches mitigating this risk is generating a build number to every single build fully automatically. Let’s take a look at how to accomplish this in common project set up – maven project build on build server e.g. TeamCIty. Sample web application follows.

Generate meta information in MANIFEST.MF

Common place where to store such kind of info is MANIFEST.MF file. All kind of archives have this file located in /META-INF/MANIFEST.MF. Various technologies like OSGi use this location for various metadata. Taking advantage of maven-war-plugin the content of MANIFEST.MF can be easily customized as follows (${xx} are maven variables):
Manifest-Version: 1.0
Archiver-Version: Plexus Archiver
Created-By: Apache Maven
Built-By: ${user.name}
Build-Jdk: ${java.version}
Specification-Title: ${project.name}
Specification-Version: ${project.version}
Specification-Vendor: ${project.organization.name}
Implementation-Title: ${project.name}
Implementation-Version: ${project.version}
Implementation-Vendor-Id: ${project.groupId}
Implementation-Vendor: ${project.organization.name}

Setup maven pom

To set up a maven project pom file is pretty easy:


org.apache.maven.plugins
maven-war-plugin

true
true

${build.number}

Where build.number variable gets supplied by build server in arbitrary format, e.g. for TeamCity build server:

Build number is visible in build queue status page as well:

Create a version page

To access these project build specific information simple jsp page can be created:
The controller accessing these information using Spring MVC (simplified example) can look like:
@Controller
public class ProjectInfoController {

&nbsp;&nbsp;&nbsp; @RequestMapping("/info")
&nbsp;&nbsp;&nbsp; public ModelAndView getProjectInfo(HttpServletRequest request, HttpServletResponse response) throws IOException {

&nbsp;&nbsp;&nbsp;&nbsp;&nbsp;&nbsp;&nbsp; ModelAndView modelAndView = new ModelAndView("projectInfoView");

&nbsp;&nbsp;&nbsp;&nbsp;&nbsp;&nbsp;&nbsp; ServletContext servletContext = request.getSession().getServletContext();

&nbsp;&nbsp;&nbsp;&nbsp;&nbsp;&nbsp;&nbsp; Properties properties = new Properties();
&nbsp;&nbsp;&nbsp;&nbsp;&nbsp;&nbsp;&nbsp; InputStream is = servletContext.getResourceAsStream("/META-INF/MANIFEST.MF");

&nbsp;&nbsp;&nbsp;&nbsp;&nbsp;&nbsp;&nbsp; properties.load(is);

&nbsp;&nbsp;&nbsp;&nbsp;&nbsp;&nbsp;&nbsp; modelAndView.addObject("buildBy",properties.getProperty("Built-By"));
&nbsp;&nbsp;&nbsp;&nbsp;&nbsp;&nbsp;&nbsp; modelAndView.addObject("buildJdk",properties.getProperty("Build-Jdk"));
&nbsp;&nbsp;&nbsp;&nbsp;&nbsp;&nbsp;&nbsp; modelAndView.addObject("specificationVersion",properties.getProperty("Specification-Version"));
&nbsp;&nbsp;&nbsp;&nbsp;&nbsp;&nbsp;&nbsp; modelAndView.addObject("specificationTitle",properties.getProperty("Specification-Title"));
&nbsp;&nbsp;&nbsp;&nbsp;&nbsp;&nbsp;&nbsp; modelAndView.addObject("implementationVendor",properties.getProperty("Implementation-Vendor-Id"));
&nbsp;&nbsp;&nbsp;&nbsp;&nbsp;&nbsp;&nbsp; modelAndView.addObject("buildNumber",properties.getProperty("Build-Number"));

&nbsp;&nbsp;&nbsp;&nbsp;&nbsp;&nbsp;&nbsp; return modelAndView;
&nbsp;&nbsp;&nbsp; }
}

Accessing MANIFEST.MF in JAR file has a different approach. Motivation taken from Spring source code:

Package  package = someClass.getPackage( );
String version = package.getImplementationVersion();

JSP page or other presentation layer shouldn’t be a problem for anyone.

Posted in Uncategorized | 1 Reply

Prague Java Developer Day 2012 Highlights

Java philosophy from very first beginning  is “compile once and run everywhere” this seems to be strengthen even more for the next version of java. The key message for java 8 is “write code once and run everywhere” which implies blurring the edge between Java SE and Java ME. The move of Java towards smartphones and tablets etc. is clear. The approach and impact to language constructs will be described briefly as was presented at the conference. As presented nothing is cut in stone at the moment but the main objective is clear.
Huge effort is being spent on a new java modularization system which would reduce an amount of consumed memory by JVM, reduce the size of final archives etc. The solution should be backward compatible with some question to current organization of JDK and potential reorganization. The solution relies on creating of new logical units composed of existing packages, classes etc. Details can  be found on project pages – Project Jigsaw.
JavaFx as a client rich platform went through a huge rewrite with version 2.0. Now supports full interoperability with Java Swing library.JavaFx scene builder released for major platforms.
Java 7 made next step towards better parallelization with fork-join framework which helps you take advantage of multiple processors. Java 8 should move the matters even further with embedding functional style programming with lambda expressions – project Lambda.
The last main feature presented for Java 8 was Type Anonotations as @Nullable, @NotNull etc. This feature is highly desirable by community as this allows better static code analysis. More info can be found here.
The afore mentioned list is neither an extensive list of features nor a final list of enhancements in java 8 but rather a plan.

BPMS lesons learned

BPMS in production environment

I couldn’t find a better topic than “BPMS (Activos 6.1) in production” to conclude the whole series of a designing system with BPMS, sharing hints for developers and testing whole solution.
Although  ActiveVOS is certainly a cool product there is, as usual, a space for future improvements. The production environment is something special and as something special, it should be treated. If the production environment is down there is simply no business. Empowering the business is the main objective of BPMS, isn’t it? So technology should be ready to cope with that kind of situations. To cut a long story short. Every feature which supports maintainability, reliability, security and sustainability in day-to-day life is highly appreciated.
During the development life-cycle, it can be hard (especially in the early stage of the development) to foresee how the system will be maintained, what the standard procedures look like, etc. The goal is to mitigate the probability of a process, human or a technical error as low as possible taking into consideration an ease of problem detection as well.

Features for production ready solution

The following pieces of functionality were found as highly desirable. Some of them are possible to avoid or at least lower the impact during the design time. For the rest of them, some developers’ effort need to be taken into consideration.

Different modes of Console

There are no distinct modes neither for development nor production environment. This comes in handy when you need to grant an access to operations for their day-to-day routine and you don’t wanna let them modify all server settings. For example, you just wanna restrict the permission to deploy new processes, start and stop services.

Reliable fall over

Maybe this question is more on the side of infrastructure. As BPMS fully lives in a DB typical solution consists of cloning a production DB to a backup DB instance. In case of a failure, this instance is started.  If some kind of inconsistency gets into the DB during the crash of the main instance then it is immediately replicated to a backup instance. Does it make sense to start a backup instance?

Lack of data archive procedures

The solution itself doesn’t offer any procedure how to archive completed processes. Because of legal restrictions specific to the business domain, you are working in you cannot simply delete completed processes.  As your DB grow in size the response time of BPMS grows as well. You can easily get into trouble with time-out policy. Data growth 200GB per month is feasible. You cannot simply work this problem out by using some advanced features of the underlying DB like partitioning because you wanna have processes which logically belongs together in one archive. You will be struggling to find out such partitioning criteria which could be used in practice and fulfils mentioned requirement.

Process upgrade

One of the killer features,  process migration of already running processes to an upgraded version works only in case of small changes of the process. Moreover what if your process consumes an external WS which lives completely on its own? What if someone enhances that service and modify that interface? Yea, versioning of the interfaces comes to attention. Having process upgrade feature without versioned interfaces is almost nonsense or at least need a special attention while releasing. Even with versioned interfaces, it is not applicable in all situations, eg. sending new data field which presence in the system is not guaranteed.  In large companies, this feature is a must. Otherwise, it is hard to manage and coordinate all the releases of all connected application.

Consider product roadmap

Actually, this item belongs to project planning phase where we make decisions about what technology to use. In some environment like banking, insurance etc. there can be legal requirements to have all products from production environment supported by a vendor. If the vendor’s release strategy is a new major version every half a year and support scope is current major version plus two major back then this could pose a problem for a product maintenance team during the product lifecycle. Migration of all non terminated processes may not be a trivial thing and as such this represents an extra cost.

Conclusion

This post summarize our exeprience with the BPMS system in production. What are your lessones leared from production environment? What feature did you missed or find really useful for production enviroment? Let me know in the comment section bellow.